Friday, January 31, 2020

The Clothesline, part one

(Above:  The Clothesline on the second floor porch at the Enos Park Art Residency in Springfield, Illinois.  Click on any image to enlarge.)

My Springfield Art Association residency proposal called for a "creative clothesline" made from vintage and found textiles that would draw attention to the benefits of line drying, the need for household energy conservation, and the beauty of doing things BY HAND!  If you've been following my blog posts, I left off after a weekend of tracing and cutting my hand and forearm outlines from fabric to which I'd already added a heat-activated adhesive (Wonder Under).  It took two days.  I estimated four hand prints per pillowcase, two on each side.  I have sixty pillowcases.  They were legally salvaged from the former South Carolina State Mental Hospital.

(Above:  A stack of thirty-two pillowcases and several household linens onto which I fused the fabric hand prints.)

I wasn't sure exactly how many hand prints I had, but it took the better part of a day to iron them onto thirty-two pillowcases.  I also added handkerchiefs, embroidered doilies, finger tip towels, and other items from my stash of vintage material.  I was finally ready to sew!


(Above:  Zigzag stitching around the fused hand prints.)

I used the stop watch on my smart phone to time how long it took to zigzag stitch around a hand print.  After stitching ten, I learned my average time was four minutes and one second.  With an average of four hand prints per pillowcase, that works out to a hair over sixteen minutes of stitching times thirty-two ... or eight-and-a-half hours.  Of course, this doesn't include the time to get the hand print under the machine, deal with the thread ends, and get the next pillowcase ready to go.  It also doesn't include the time to stitch around the added doilies, handkerchiefs, etc. or eat or go to the bathroom or sight-see in Springfield.  Also, I promised myself that I would NOT work on The Clothesline in the evenings.  That's been a time to hand-stitch on 12" x 12" mini art quilts.

 (Above:  Chairs that helped organize my stitching!)

It took two-and-a-half days to complete the stitching on these thirty-two pillowcases and five vintage pieces.  To speed up the process, I knew I couldn't stitch the pillowcases individually.  I would spend way too much time switching out bobbin and top thread.  So, I used three chairs to keep track of what I was doing.  How did this work?  Well when stitching with blue thread, I worked my way through the original stack ... stitching around the hand prints needing blue thread ... and putting that pillowcase onto the next chair, creating a stack of "blue finished" pillowcases.  Then, I switched to pink thread and worked through the stack ... putting each "pink finished" pillowcase back on the first chair. Back and forth the stack went.  As a pillowcase got totally finished, it went on the third chair ... until they were all there ... done! 

 (Above:  Ironing the finished pillowcases.)

This morning I ironed the finished stack.  I took photos of several of the pieces.


For some reason, I tended to snap images of the single hand prints on a found textile.


As I ironed, I tallied the hand prints.  My estimate was off a little (probably because of the several "single" hand print sides!).  There are now one-hundred and seventeen hand prints in the collection.


I think I really like the single hand print sides because I've never really had a good use for handkerchiefs, especially not the sort that were "made in China".  They've always looked sort of "cheap" to me even though I am well aware that many were given as special Mother's Day, anniversary, and Christmas gifts.  They have stories to tell despite the dime store appearance ...


... they really add to these pillowcases!


After ironing all the pillowcases, I decided to hang them on the residency porch.  I'm on the second floor; so they are safe.


This represents a solid week of work with a minimum of eight hours a day on the project. Yet, the results only fill two lengths of the porch's width.  Each pillowcase is only seventeen inches on the short side.  Once all sixty are finished, I'll have eighty-five feet of clothesline (or just twenty-five yards). 

 (Above:  A ball of yellow cording brought from home for the actually clothesline and a container of thread donated to me by a friend.)

I'm really pleased with the progress of this project and especially honored to have this art residency during which I can bring it into existence.  Without this dedicated time to focus on the work, The Clothesline probably wouldn't happen.  At home, I can't spend eight hours a day for several weeks on any one project.  This is what makes an art residency truly "a gift of time."  Below are more photos from the porch!  Now ... back to work!  I've got another twenty-eight pillowcases and more vintage textiles needing hand prints that I haven't even cut yet!


Monday, January 27, 2020

The Clothesline Begins and Tour of Edwards Place Mansion

 (Above:  First five items for The Clothesline.  Click on any image to enlarge.)

Once all the stitching on the twenty quilt blocks for Sue's Environmental To Do List were finished, it was time to turn my attention to the heart of my art residency proposal:  to fashion a creative clothesline from vintage and found materials that focuses on the benefits of line drying, conserving household energy, and doing things (like using a clothesline!) BY HAND.
 
 (Above: The living room at the Enos Park Art Residency duplex with sorted linens.)

Honestly, I wasn't entirely sure how this project was going to work.  I only had a "foggy vision" for the way it might look, but I knew I would need at least two tubs of vintage fabric.  I don't always know what is inside these tubs.  There's no real organization to them.  The contents came from thrift stores, yard sales, Bill Mishoe's auction, and from generous friends.  So first, I sorted the stuff into piles in the residency duplex's living room.  Having space for such a task is one of the top reasons I seek out residency opportunities.  Like most artists, I've already filled almost all the available space in my home and studio!  It was fun to spread out and really look at what I brought.

 (Above:  A piece of vintage material covered with a fusible and from which a hand print was cut.)

I also knew that my concept included the visual use of a fabric hand print on the vintage linens.  Hands automatically symbolize a sense of touch, an act of doing, and the suggestion of "hand made/hand done."  So, I ironed Wonder Under, a heat activated adhesive, to the reverse of several pieces of fabric including some 1950s-60s era plaid picnic clothes.  I traced my hand on the adhesive's facing paper and cut along the outline. 

I cut just a few hand prints out and used them on five items.  These are the five pieces in this blog post's top image.  I zigzag stitched around each hand print and hung the five on my inside clothesline.  I liked what I saw!  Thank goodness! I now consider these five "the prototypes" for The Clothesline. What will come won't be different. Yet, it was important to make these first ones in order to figure out how to proceed.

 (Above:  Shelving unit with sixty pillowcases.)

As soon as these five pieces were hanging, the "fog" in my former vision began to lift.  I formed an action place!  First, I counted the pillowcases I once legally salvaged from the former South Carolina State Mental Hospital's laundry building.  Including the one in the prototypes, there is a total of sixty-one.  The pillowcase in the group of prototypes used four hand prints, two on each side.

(Above:  Hand prints cut from the facing paper of the Wonder Under being used for outlines to cut even more fabric hand prints.)

It doesn't take higher mathematics to realize that sixty pillowcases, each with four fabric hand prints, will require a total of 240!  That's a lot of fusing and cutting.  I fused lengths of Wonder Under onto several pieces of found fabric.  Carefully, I pulled up half the facing paper and inserted some of the facing-paper hand prints cut for the prototypes.  I then pulled up the other side, inserted more hand prints, and ironed the top facing paper back down.  Then, I cut the fabric around the hand prints.


The more I fused and cut, the more facing-paper hand prints came into existence.  For a moment, I thought about how I might use all these pieces.  Then reality hit!  I can't use EVERYTHING ...


... especially when I also ended up with a large bowl of fabric cut away from the fabric hand prints.  All this fabric has Wonder Under ironed to the reverse.  I threw out the facing-paper hand prints and am trying to figure out something to do with these scraps.


By the end of the weekend, I had all these fabric hand prints cut and ready to be used.  I've started in earnest and will update the progress of this installation soon!  Check back!

 (Above:  Edwards Place.)

Now as much ironing and fusing as I've been doing, one might think I've done little else ... but that is hardly the case!  Recently I toured Edwards Place ... which is part of the Springfield Arts Association and has been since 1913.  This mansion was once the home of attorney Benjamin Edwards, youngest son of Governor Ninian Edwards and brother-in-law of Mary Lincoln’s sister Elizabeth. In 1913 Alice Edwards Ferguson was approached by members of the Springfield Amateur Art Study Club for permission to rent rooms in Edwards Place as meeting place but she surprised them by offering to donate the entire house to serve as meeting, gallery, and classroom space.


I didn't have to go far!  The residency duplex is on the grounds.  My van is literally parked beside a brick wall that extends from the Springfield Arts Association office. Edwards Place was used as an art gallery until 1937. Art classes were being held in the upstairs bedrooms as late as the 1960s. Today Edwards Place is a historic house museum interpreting the social and domestic life of Abraham Lincoln's Springfield, Illinois. A full-scale restoration in 2014-2105 restored the first floor and much of the second floor to its c. 1857 appearance.  So ... below are some of the photos I took while touring the mansion.  It is a wonderful place!

 (Above:  The parlor ... looking in one direction.)

 (Above:  The parlor ... looking in the other direction.)

(Above:  Still in the parlor ... looking behind me to the "courting couch" on which Abraham and Mary undoubtedly sat during the early days of their romance.  At that time, the couch was owned by Mary's sister and was located in her house elsewhere in Springfield.)


As much as I love the rooms, I often find myself focusing on the small details!


Upstairs.  Several of the rooms include places or patches of original wallpaper or, in this case, the painted plaster.


This is a view to through the second floor's ceiling skylight.

Saturday, January 25, 2020

Raven, Anti-Rust, and the Springfield Art Association

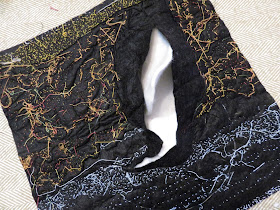
(Above:  Raven, 12" x 12", digital image on fabric with hand and free-motion stitching, trapunto, and buttons.  Click on any image to enlarge.)

I brought three digital images printed on fabric by Spoonflower to this four-week Enos Park art residency and have finished the first.  For me, it is a special photo taken on a special day in a special place.  The experience of being so very, very close to an unafraid raven was profound.


Late in the summer of 2017, my husband Steve and I were visiting Bryce Canyon National Park in Utah. This is a place visited by my grandparents in 1961.  After seeing the three slides my Grandpa Baker took, I wanted to visit. I imagined walking on his footprints.  The day seemed magical, and then it became spiritual.  A raven flew up to Ponderosa Overlook, as if personally paying me a visit.  I think he was.  Some will say this is total hogwash, but for me this was the spirit of a friend who passed away.  Kim Lemasters was a talented artist who often painted ravens.  He worked with me at Mouse House for years. The raven sat beside me for quite some time, as if telling me a final good-bye. He then took flight.  Rest in peace, Kim.

Below, I have in-process photos for this small art quilt ... but first ...

 (Anti-Rust, a women's literary group at the Sangamo Club in downtown Springfield.)

... I want to share an amazing morning with Anti-Rust, a group established in 1894.  Each year the ladies select a board, overall topic.  Members take turns presenting topics.  For this meeting Kathy Johnson spoke about diplomacy.  Her credentials after an entire career in foreign service are amazing, her stories enlightening, and the information most eye-opening.  (CLICK HERE for Kathy's impressive biography.)

 (Above:  Kathy Johnson and me.)

Some will say that my belief in matters of serendipity are just coincidences, not the regular occurrence of minor miracles.  I disagree!  Why?  Well, before coming to Illinois, I consulted the membership directory of SAQA (Studio Art Quilt Associates) to see if anyone lived within an hour's drive from Springfield.  None did. I had hoped to network with like-minded fiber artist in the area ... but "Oh well".

After arriving, however, I got an email from Kathy.  Not only is she a SAQA member but she serves on the organization's development committee.  (She recently moved and hadn't changed her on-line address with SAQA!) That's how I got an invitation to Anti-Rust where I've met all sorts of wonderful ladies, many of whom are on the boards of local non-profits and all of whom are interested in my residency proposal!  If that's not a sign of some higher spirit at work in my life, what is?!

 (Above:  Raven, in-process.)

So ... to return to Raven.  I first did a little free-motion machine stitching, paying close attention to an outline around the bird.  Once the hand stitching and beaded were done, I traced the bird, roughly a quarter inch inside the stitched outline.  The traced shape was used to cut a piece of white felt.  I cut two smaller pieces that fit inside the first felt shape.


I used a piece of synthetic black felt behind the stitching.  Carefully, I cut a slit down in this felt ... down the center of the bird's outline.  The larger piece of felt was inserted.  The smaller pieces went on top of it.  Why put the smaller ones on the back, not the front of the felt?  Well, when the largest piece is next to the facing fabric, it makes a smoother transition in the stuffed levels.  Then, I used sewing thread to hand stitch the slit back together.

(Detail of Raven.)

This "stuffing" technique is called trapunto.  I really like the slight dimensional quality.  The raven projects just a little from the background.

 (Detail of Raven.)

The edge of the piece is embellished with buttons.  There is no binding, but to link the layers, I've done a buttonhole stitch around the entire edge.

(Above: Raven, reverse.)

The buttonhole stitch really isn't seen from the front, but it is definitely part of the reverse.  By the way, I didn't intentionally bring this nice, southwestern looking fabric with me.  I didn't really know I even owned it.  It just happened to be in one of the tubs of fabric brought for the creative clothesline.  Another incident of serendipity!

 (Above:  The 2D classroom at the Springfield Art Association.)

Now ... I'd like to take you on a tour of the art facilities at the Springfield Art Association!  This is an amazing place.  Established in 1909 by eight local women, the organization grew quickly to have over one hundred members by 1913 when the Edwards Place became its home.  (I'll be blogging about this Victorian mansion soon.) A "fire-proof" gallery was added in 1937 and the Condell Studio of Art classrooms were added in 1949.  Further additions continued, adding a place for ceramics in 1963. Later came the Smith and Nickelson state-of-the-arts metals/jewelry studio.  More recently, a computer lab and Baima glass studio were added.  I was floored by these fabulous spaces.  Below is a visual tour!

 One side of the immense ceramics studio ...

 ... the other side ... and I didn't get a photo of the various kilns!

 The computer lab.

 Half of the Baima Glass studio.  The other half is for leaded glass.

 The print and paper-making studio.

 The Smith and Nickelson metal/jewelry studio ... which had more equipment than I could imagine ...

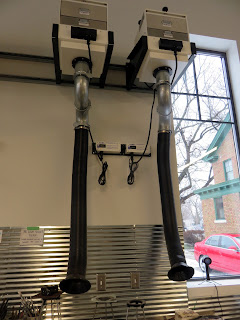
... especially since I couldn't believe how wonderful the exhaust system is!

Do return to my blog ... as I have begun the "creative clothesline" project in earnest and will be sharing other places in Springfield!