Tuesday, October 30, 2012

Packing for Houston ... New Portrait and New Video


(Above:  Detail of In Box XCII including signature box.  Click on image to enlarge.)

This time tomorrow I'll be on a plane headed to Houston for the big Quilt's Inc.'s 2012 International Quilt Festival.  I've referred to such a trip as "going to Mecca".  I'm excited ... though admittedly, also a little nervous.  Last year's festival enjoyed attendance in excess of 60,000 over the four days.


(Above:  Comb bound book featuring all 107 Decision Portraits.)

In Texas, I'll be sitting with my solo exhibition, Decision Portraits.  Forty of the pieces were curated for this opportunity.  Yet, all the pieces will be there in a book I had printed at DPK Printing.  The Decision Portrait Series blog has also been totally revamped in order to "read like a book" too.  In fact, I wrote an "introduction" to this series too.  In six brief, illustrated pages, I've written a brief history ... how I started, how the project progressed, the concept and the exhibitions it has enjoyed.  To view this, CLICK HERE.


(Above:  Xylene photo transfer on tea-stained muslin ... in the garage ... where I wear a ventilator to create the transfer.  I generally have two photocopies printed just in case the first one isn't quite right.  This one went PERFECTLY.  The transfer is on the left.  The extra photocopy is on the right.  Click on image to enlarge

While sitting with my show, I will be stitching on the first new portrait in over two years.  I've wanted to stitch this piece since the very start of the series but couldn't find a willing participant ... until recently.  This new portrait will be called Aylah. There is only one other piece named for the "model".  The stitched words will read:  I didn't buckle up.  It will also include the dates:  July 24, 1991 - December 6, 2006.  A local auto salvage company donated the seat belt.


(Above:  The seat belt laying on top of the portrait with recycled white acrylic felt and Thai Stucco paper backing.  Click on image to enlarge.)

Several threads, yarns, and beads with be added.  They are now packed along with the portrait.  I can't wait to get started.  This is a perfect piece to share with people browsing through the special exhibition area of the Quilt Festival.  It is powerful and an excellent example of what this series is about and why I am so passionate about it.

 
(Above:  In Box XCII, stapled to a stretcher bar and ready to be soldered and melted.  Click on image to enlarge.)

Before leaving, however, I had to finish my most recent "In Box Series" piece.  My last blog post showed how the work progressed from a recycled black acrylic felt substrata through the layers of polyester stretch velvets with metallic foiling and an overlay of chiffon scarves through free motion machine embroidery.  Next, I stapled the piece to a stretcher bar and plugged in my two sizes of soldering irons (which are generally kept in the tin can.)

 
(Above:  Soldering on In Box XCII.  Click on image to enlarge.)

It is easy to poke holes in the layers of polyester velvet.  I also use the fine tipped soldering iron to drag small lines through the material.  After every "box" is embellished, it is time to melt.  Steve shot a video of this.  It is now on UTube and on my video blog


(Above:  In Box XCII.  Click on image to enlarge.)

The image at the start of this blog post is a detail of the lower right corner, including my signature box. I've already started the next In Box piece.  It will be finished after my return from Houston.  I'm taking my laptop with me and hope to post from Texas. 

Saturday, October 27, 2012

Polyester Stretch Velvet, Anita Hill, moped accident, and a snake!


(Above:  First layer of polyester stretch velvet on recycled black, acrylic felt with metallic foiling.  Click on image to enlarge.)

A couple of months ago I applied for a merit award as a first time vendor for the Buyers Market of American annual wholesale fine craft show in Philadelphia.  I was accepted!  What does this mean?  Well, on the weekend of February 16 - 18th, 2013, I'll be set up in a booth with my "In Box" and "Faux-stained Glass" series ... complete with a brochure, order forms, and awaiting wholesale buyers from all over the country to place orders.  This is scary!  Why?  Well, I'll be investing in a professional "Pro Panel" art booth, renting a cargo van, and spending several nights in a hotel.  That's a lot of money but it is also a great opportunity to network with galleries, interior designers, museum gift shop buyers, etc.  With the merit award, my booth rent isn't the standard $2250 + ... just the $750 deposit.

 
 (Above:  Window XXXIV, finalist in the 2013 Niche Awards in the Decorative Fibers category.  Click on image to enlarge.)

The Buyers Market of America is also where the 2013 Niche Award winners are announced.  I applied in 2011 and won the award for decorative fibers.  Since I'm going to this important wholesale event, I applied again this year and am happy to say that Window XXXIV has been selected as a finalist in this category!


(Above:  Small sketch for five faux-stained glass designs.  Click on image to enlarge.)

While I have plenty of work, most of it is at the Grovewood Gallery in Asheville where I'm represented.  I don't want to "raid" this location!  I am very proud to have work in this prestigious location.  One of my goals for the Buyers Market is to get "signed" with other, similar fine craft galleries in other parts of the country.  Thus, I'm now making more work ... getting ready for this big show.  All but one of my large, faux-stained glass fiber pieces are in Grovewood.  The same goes for my larger "In Box" series pieces.  So ... first I had to design new work.  Above are five small sketches ... 6" x 2" ... divided into quarters.


(Above:  Large sketches for the same five faux-stained glass designs on my studio floor.  Drawn to scale.  Click on image to enlarge.)

I have a roll of white paper and cut pieces to approximately 60" x 20".  By folding the pieces into quarters, I can follow the small sketches ... transferring the design by sight.  I don't actually use these sketches as a direct pattern.  Instead, I cut all the pieces by hand using the visual illustration as a guide for approximate scale.  This method assures a great deal of uniqueness in every piece even if the same design is referenced.  Once the designs are ready, it is time to prepare the materials.


(Above:  Pieces of recycled, black acrylic felt cut and labeled for the various works that will be created.  Click on image to enlarge.) 

My substrata is recycled, black acrylic felt.  All this felt was once the packaging material for a kayak or canoe on its way from a North Carolina manufacturer to the local distributor, River Runner, an outdoor shop here in Columbia.  The generous owner, Guy Jones, has been giving me felt for years!  It is used for all three sizes of faux-stained glass and all three sizes of my "In Box" series too.  Some of the pieces in the photo above already have WonderUnder (Bond-a-Web) ironed to it.

 
(Above:  Piece of recycled, black acrylic felt with WonderUnder about to be ironed to it.)

I go through bolts of WonderUnder (Bond-a-Web).  Currently, I've used my latest 50% off coupon from Joann Fabrics to order three more bolts.  The photo above show the first layer of Wonder Under going onto the black acrylic felt that was cut for a large, faux stained glass fiber piece.  I know that all my polyester stretch velvet also has WonderUnder ironed to the reverse ... but I like the extra layer on the felt.  It also helps define the edges of the work.


Then it is time to get out my polyester stretch velvet.  I keep it in a giant tub.  I have every color I can find!  What's in the photo above doesn't have WonderUnder already ironed on the back.


I had already removed the pieces that did have WonderUnder ironed onto it.  This is my "palette" ... which I keep on the floor where I can see what I have at a glance.  Yes, my studio is a disaster area when I'm working on these pieces!


(Above:  An "In Box" series piece ... layer one complete. Click on image to enlarge.)

I didn't start with one of the large faux-stained glass fiber pieces.  I'll wait for my three bolts of WonderUnder that are on order and iron up at least one bolt onto more polyester velvet.  These pieces require really large sections of polyester velvet.  In the meantime, I decided to create a new "In Box".  The pieces needed are quite small and I already had plenty of little scraps on hand.  Above is the first layer of squares and rectangles.


(Above:   An "In Box" series piece under construction ... layer one with metallic foiling.  Click on image to enlarge.)

 Next, I hand tear pieces of previously painted WonderUnder and iron them onto the "boxes".  To this, I apply metallic foiling.  Generally, I order my metallic foil from The Thread Studios (which is also where I order my chiffon scarves.)  This time, however, I used the "leftovers" from Ye Olde Bookbinder.  I met Larry Dubois at the Southeastern Book Festival.  He agreed to save his metallic foiling for me.  He can only use pristine pieces.  I, however, can "grab" the foil off the cellophane carrier until there's nothing left.  I really liked how his stamped designs and letters transferred to my piece.  The photo at the beginning of this blog post shows a detail.


(Above:  An "In Box" series piece under construction ... second layer.  Click on image to enlarge.)

After the metallic foiling, I add smaller pieces of polyester velvet ... sometimes four layer deep.  Then comes more hand torn pieces of previously painted WonderUnder and scraps of chiffon scarves.


(Above:  An "In Box" series piece under construction ... third layer ... pieces of chiffon scarves.  Click on image to enlarge.)

I add the chiffon scarves for two main reasons.  First, it adds an overlap of color, a complexity of in shading, and added interest.  It helps obscure the fact that these pieces are made from the tackiest material!  Second, the chiffon scarves put a smooth surface over the otherwise plastic, almost "sticky" feel of the WonderUnder.  It makes free motion machine embroidery easy and fun.


(Above:  An "In Box" series piece under construction ... free motion machine embroidery using 100% black cotton thread.  Click on image to enlarge.)

The piece is now ready to be stitched.  I use only 100% black cotton thread.  Why?  Well the next step is the melting phase.  I use a soldering iron for holes and a heavy duty heat gun to melt the shapes apart.  The felt between the "boxes" is the thinnest and first to melt.  The black cotton "bridges" that link all these "boxes" don't melt.  They're cotton!  I'll blog about this process later.  I'm already late for linking this post to Nina-Marie's "Off the Wall Fridays", a blog that includes "works in progress" ... which this certainly is!


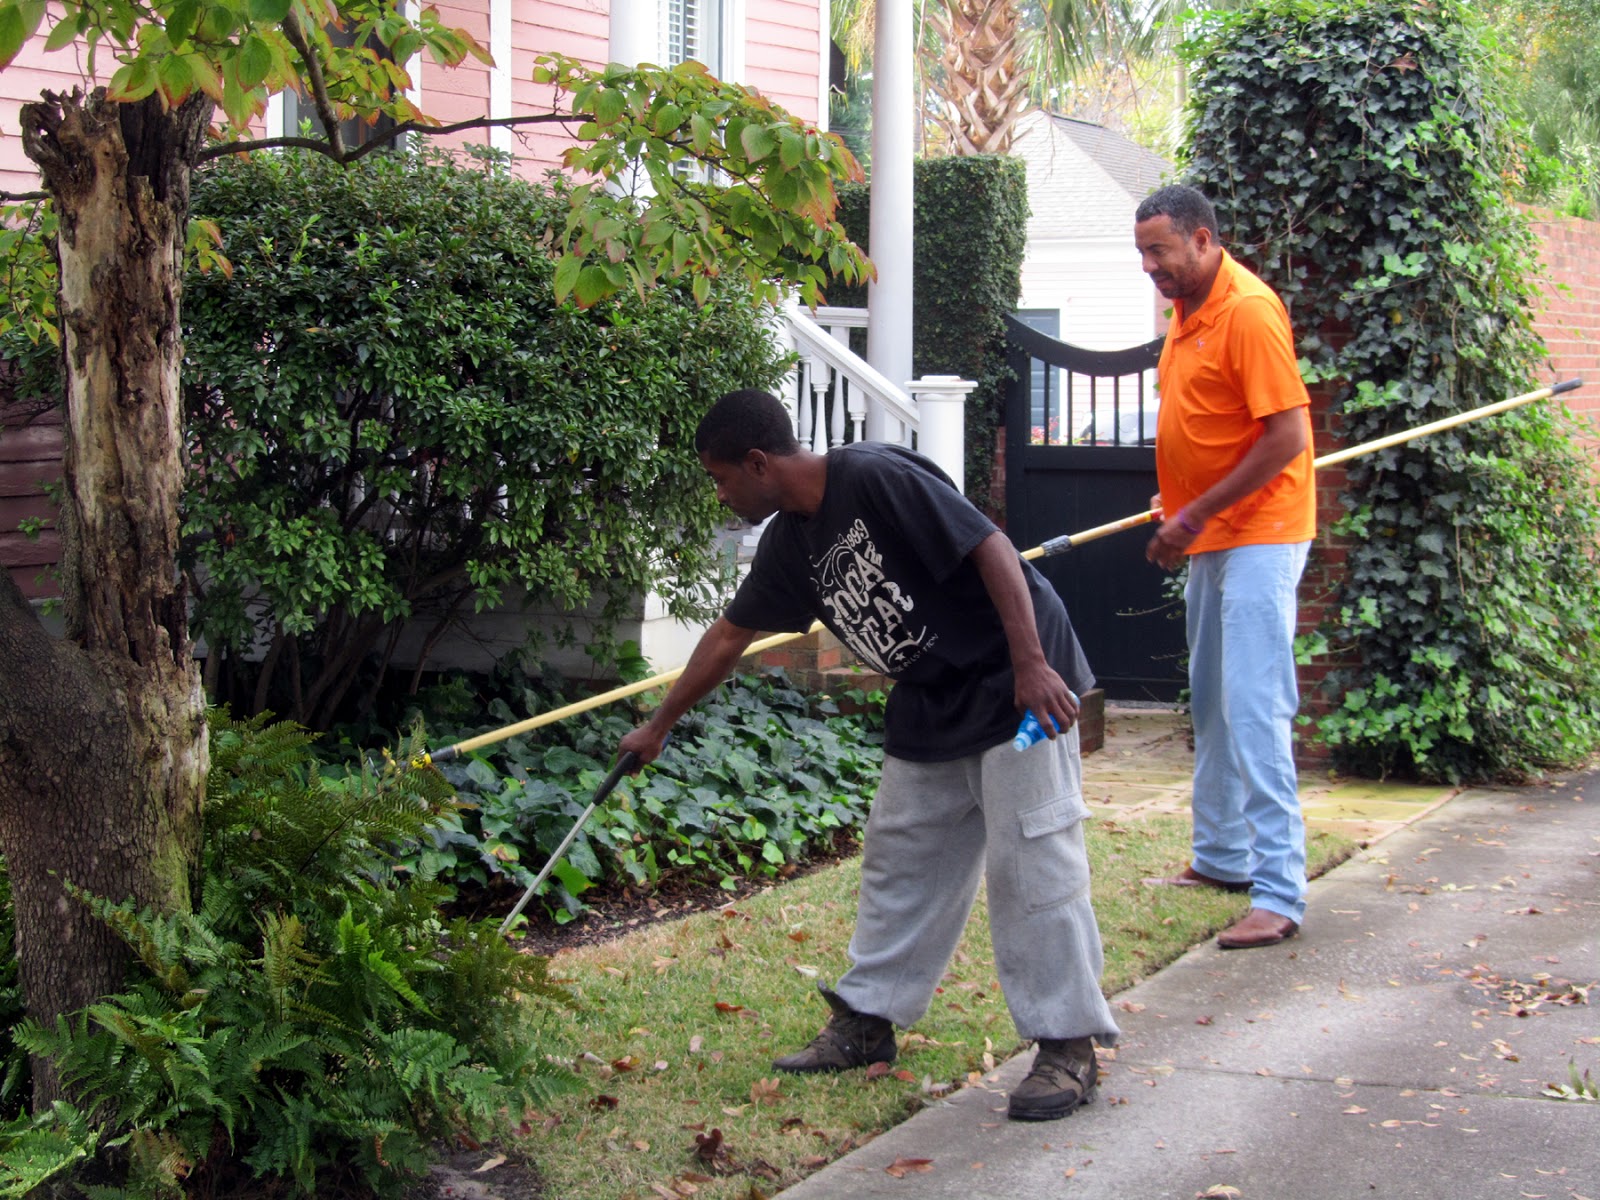
(Above:  Spike ... a neighborhood black snake!)

Before I sign off, I'd like to share a couple of other things that have gone on this past week ... including SPIKE!  That's my new name for a black snake we found in our front bushes yesterday.


Please note, we live in downtown Columbia, South Carolina.  This is NOT out in the country at all.  We knew that Spike must have lived here for quite some time too.  He wasn't exactly "short".


By the time we rustled Spike from the bushes, people were stopping their passing cars to snap photos.  Thankfully, our neighbor Jerry Finney, took time from his law practice in order to pick Spike up and transfer his to the other side of our house ... instead of going under Jerry's porch (pink house).  Spike immediately climbed a tree ... over ten feet up in the air.  We all agreed that Spike should stay ... and eat our mice and stray varmits.  From the size of Spike, he's been doing this for quite some time.


Last Tuesday was also the annual "I Believe Anita Hill" party.  I went on the moped.  I also got hit on the moped.  A lady driving a car ... who thought she saw a parking place ... backed up over me.  Momentarily I was under the moped and under her trunk.  Another car load of ladies coming to the event came screaming to my rescue.  Amazingly, I sustained only a scrapped leg and a slightly bloodied elbow.  The moped is fine too.  The driver was mortified.  We knew one another ... Facebook friends!  We all decided that if this was the worst accident we were ever in ... it wasn't that bad.  Then, we all went in to the party.  I can't believe it has been twenty-one years since the Anita Hill scandal!  (Photo below)

Friday, October 19, 2012

Epoxy Day


(Above:  Protective tyvek suit with hood, plastic gloves, goggles ... I'm ready for "Epoxy Day".)

Earlier this week I finished the hand stitching on the last two of six new fiber pieces meant to explore the texture and surface of "wet sand".  It was time to pour epoxy over them ... to create the look of water, the sheen and reflection one often sees while walking along an ocean beach.  The first experiment with epoxy went very, very well.  I blogged about it HERE.  My husband Steve and I learned a lot from this initial experience and decided that this time we'd set up the actual "pour site" in the parking.  This meant it was unnecessary to wear the ventilation mask.  It also gave us more room in which to work and more space inside the garage for the pieces to lay flat and to dry.
 
 
 (Above:  Ready for the epoxy pour.  Click on any image to enlarge.)

This time was also different because we were using a professional/artist grade epoxy instead of the stuff available in many hardware stores for covering garage or patio floors.  This "new" epoxy is made by Environmental Technology , Inc. and is called EX-74.  It is specially formulated to include UV filters and to reduce any future yellowing.  The ratio of the two-part solution is 1:1, which meant we didn't have to use the entire gallon.  The instructions included a formula to calculate the quantity needed for square inch coverage.  Thus, we only mixed a total of one gallon (about half of each solution.)  We used the small mixing buckets to carefully measure the two parts.  We used the large buckets for vigorous stirring ... first in one bucket, then dumped into the second bucket for continued stirring.  With the two parts perfectly and very thoroughly mixed, hardening starts within twenty-five minutes.

 
 (Above:  Six large and five small "sand pieces" on our trash cans ... ready to have epoxy poured over them.)

I had to work fast ... pouring the epoxy on the fabric and spreading it like thick, clear molasses.  I used two small pieces of mat board for the spreading and then handed each piece off to Steve.  He took each piece to the garage while I grabbed and started pouring on the next piece.

 
 (Above:  Steve's work table in the garage along with chips of wood.)

We'd already covered the garage's work table with corrugated.  From the first epoxy experience, we learned that this epoxy does tend to drip, spread, and run ... and then later, it is almost permanently glued onto whatever surface onto which it leaked.  The chips of wood elevated each piece off the corrugate ... which prevented any leaked epoxy from attaching the back of any piece to the corrugate!


(Above:  Steve's work table with all the pieces drying.  Click on image to enlarge.)

The EX-74 is actually a bit thicker than the epoxy from the hardware store.  So ... it didn't run and ooze as badly and didn't drip all over everything as much.  Yet, it is clear from the photo above that there is still a little puddling around each elevated work.  I had also prepared three small containers into which I poured epoxy.


(Above:  Three small containers with vintage ephemera and poured epoxy.)

Keys, buttons, a bobbin, a cross, nails, a folded letter from 1898, springs and other clock gears filled these little containers and will eventually find their way into one of my 3D assemblages.  I really enjoyed these and plan on making more.


(Above:  Table lot at a recent clock auction.)

I had hoped to increase my collection of clock parts at a recent auction.  It was a wonderful sale but also very well advertised.  Clock dealers from Tennessee, North Carolina, and Georgia were in attendance.  The table lots of parts and pieces were all too rich for my pocketbook, but I took nearly one hundred detail images ... perhaps for future work ... perhaps just for inspiration.


(Above:  Detail image from a box of pocket watches in various states of repair.  Click on image to enlarge.)

I would have loved this box of pocket watches for my artwork ... but, alas, I was never even in on the bidding!


(Above:  St. Peter's churchyard at night.)

Another inspirational moment this week came during the monthly Congaree Vista Guild meeting which was held at St. Peter's church.  We were given a twilight tour of the sanctuary and the cemetery!  I loved every moment of it.  This post is also being linked to Nina-Marie's "Off the Wall Fridays" blog that showcases other fiber artworks in progress!

Tuesday, October 16, 2012

Decision Portrait Blog ... reads like a book!


(Above:  The forty pieces that will be on display in Houston.  Click on image to enlarge.)

In anticipation of going to Quilt Inc's. 2012 International Quilt Festival in Houston later this month, I totally revamped the entire Decision Portrait Series blog.  It used to be a place to explain the series to potential participants.  Then it was a place to document the work being produced.  Now ... IT READS LIKE A BOOK ... alphabetically arranged.  Each piece includes an image that can be enlarged for closer inspection and "the rest of the story" behind the work.

So, I'll be sitting with my solo show in Houston... right in the middle of the special exhibitions area ... for four days, November 1 - 4 ... talking about the series, the pieces on view, and the various decisions I stitched while creating the 107 total works.  Forty of the works will be with me ... but the others will be easily available on the Internet.  I will also be stitching on piece 108.  It is VERY SPECIAL.  It is one of the pieces I most wanted to stitch when actively making this work.  The decision was a fatal one, a fifteen year old girl who didn't buckle up.  Her Mom misses her and wants to spread awareness.  Her Mom is also a quilter.  It is my honor to stitch this piece in public.

Please visit the new Decision Portrait Series blog ... and, if there's something "wrong", let me know ... before Halloween when I'll be flying to Texas!    

Friday, October 12, 2012

Healthcare in America, a work in progress


(Above:  Healthcare in America, a work in progress.  9 1/2" x 19" x 19".  Recycled prescription bottles, pills, shredding paper, painted mat board rims, glue.  Click on image to enlarge.)

I started this piece over a week ago.  At the time, it seemed like a straight-forward, easy to accomplish, quick project.  It started with "a vision".  In my mind, I saw the bottles all lining up in perfect circles with shredded healthcare policies filling the vessel.


(Above:  Healthcare in America, in progress ... with a tub of shredded healthcare papers, empty vials of vitamins and calcium, cotton balls.  Click on image to enlarge.)

Of course, reality interfered with "my vision".   There were over a dozen different sizes and styles of prescription bottles. Each one had plastic parts at the top into which the threading of its lid fit.  These plastic parts made the top of the bottles wider than the bottoms ... and made lining up the bottle flat against one another totally impossible.  Creating the vessel was quite a challenge  ... but it was fun!


(Above:  Steve reviewing our health care policy and comparing several on-line quotes.)

The next problem with my "vision" for this piece was the shredded paperwork.  Steve helped provide some of our health care policies.  Printed materials about Obamacare and the Republican plans were easy to find ... but all these pages simply looked like "shredded paper" ... any paper ... not necessarily paper that had anything to do with health care.  I wanted it to be more obvious ... for the shredded paper to instantly be recognizable as being health care related.  What to do?

 
 (Above:  Shredded paper for Healthcare in America.  Click on image to enlarge.)

I made my own paperwork ... copying and pasting health care provider logos and statements about national health insurance coverage along with photocopied tables from some of our policies.  Seventy-five pages (front and back) were printed in full color.  (25-cents per side).  One hundred pages of "statements" were printed in black-and-white (4-cents per side).  I'm grateful to DPK Printing in Columbia's Vista for their every day low printing prices!  I've been cutting and curling each page by hand ever since.  These pages will fill the vessel once it is complete.   


 (Above:  Healthcare in America, view from the side.  Click on image to enlarge.)

My "vision" didn't include anything being in the prescription bottles ... but, since the construction rendered the vessel quite differently, I decided to fill them.  Steve bought four large bottles of calcium and two giant bottles of generic aspirin for me to use.  I added some of the shredded paper and cotton ball tops.  


(Above:  Healthcare in America, view into the vessel.  Click on image to enlarge.)

Some of the bottles were only accessible from the inside.  Others could be filled from the outside.  It took lots longer than I anticipated to complete this task.  In the process, the top orange rim came off.  Currently, it has been re-glued and is under weights.  Soon ... I'll be able to fill the vessel with the rest of shredded healthcare papers (as soon as I finish curling them all!)

 
(Above:  Wet Sand III - VI, stacked.  Click on image to enlarge.)

Of course, I'm not just working on one project.  I'm almost never without some stitching to do.  This week I finished the hand embroidery on four pieces.  (I'm still working on two more!)  They've been stitched to rag mat board.  The mat board has been glued to wooden strainers and wired for hanging.


(Above:  Wet Sand III, before the epoxy pour.  16" x 16".  Click on image to enlarge.)

Back in July I completed the first two pieces in this series based on the texture of a sandy beach.  I loved how they turned out and planned to create more for the upcoming Vista Lights exhibit here in Columbia.  The foundations are squares of material cut from a used painter's drop cloth.  This drop cloth looked like sand to begin with.  I washed it.  It still looked like sand.  With a piece of recycled white acrylic felt behind each square, I stitched ... free-motion machine embroidery ... following the lines and paint splatters ... interpreting the stains and marks ... enhancing the surface ... making it look even more like sand.


(Above:  Wet Sand IV, before the epoxy pour.  16" x 16".  Click on image to enlarge.)

After machine stitching all six new pieces, I added running, straight, French knots, and seedy stitches for more texture.  Most of the threads I've been using are in a giant tangle inside a gallon Ziploc bag.  I have no idea what they are or where I got them ... probably from some yard sale or at auction.  They're just monochromatic "thread" ... something for texture.  


(Above:  Wet Sand V, before the epoxy pour.  16" x 16".  Click on image to enlarge.)

As soon as I finish the hand stitching on the last two pieces, I'll be ready for "the final steps".  I'll seal each work with a coating of Golden's GAC 400, a fabric stiffener.  Then, I'll pour epoxy over the surfaces.  The result is the true-to-life look of WET sand.  Subtle, shallow puddles of epoxy truly resemble water.  The surface looks wet ... with a glossy, reflective layer which is really hard to capture with a digital photograph.
 

(Above:  Wet Sand VI, before the epoxy pour.  16" x 16".  Click on image to enlarge.)

My initial epoxy experiments (and the first two pieces in this series) were blogged about HERE.  I'm planning on taking over Steve's garage this Sunday.  What fun!


(Above:  Me at "UNEARTH:  A Celebration of Naturally Inspired Art" at Saluda Shoals Park last Sunday afternoon.)

Last Sunday I was at "UNEARTH" demonstrating basic Japanese stab book binding for photo albums and showing off some artwork inspired by nature ... including Wet Sand I and II.  It was a great day.  It's been a great week too.  This post will be connected to Nina-Marie's "Off the Wall Fridays", a collection of other "works in progress" by fiber artist working all over the world!  Take a look!

Tuesday, October 09, 2012

To Laugh Often ... and Quilt National Acceptance !!!


(Above:  To Laugh Often, Grave Rubbing Art Quilt.  50" x 36".  Crayon on silk grave rubbings, vintage buttons, hand and free-motion machine embroidery.  Click on image to enlarge.)


(Above:  The grave stone used for this art quilt.  Click on image to enlarge.)

I made the upper grave rubbing while visiting Edinburgh, Scotland last May.  It was the only one made during the trip ... which seemed a little strange since Edinburgh is really known for its ancient and ornate tombstones.  Well, the cemeteries were fabulous.  The state of decay added to the sense of history.  I was overwhelmed ... but the high/sculptural relief, massive sizes, and and the dizzying heights of these monuments just wasn't conducive for grave rubbings.  This really was the only stone I could have used.  Thus, I felt compelled to stitch it.  Somehow, it just needed something "more".

In July I figured out just what "more" would be.   A hair-brained idea took me to the local cemetery in nearly 100 degree temperatures ... armed with a big piece of silk, a black crayon, and the following Ralph Waldo Emerson quotation:

To laugh often and much; to win the respect of intelligent people and the affection of children; to earn the appreciation of honest critics and endure the betrayal of false friends; to appreciate beauty; to find the best in others; to leave the world a bit better, whether by a healthy child, a garden patch or a redeemed social condition; to know even one life has breathed easier because you have lived. This is to have succeeded.


(Above:  To Laugh Often in progress.)

I ran around from grave to grave making individual rubbings of all the letters.  Then the stitching began.  First, free-motion machine embroidery around all the individual letters.  Then millions of seeding stitches for the background.  I stitched on this piece all the way to my art residency in Galesburg, Illinois and finished it during the first week.  I was so pleased with it that I didn't post the completed piece on my blog ... until now.


 (Above:  To Laugh Often, detail.  Click on image to enlarge.)

Why wait?  Well, I entered this piece and Circular Churchyard into the very prestigious Quilt National 2013 international juried exhibition.  This show has very strict rules about showing the work outside the realm of one's personal website and/or blog.  Since there's no real control over who may or may not "grab" an Internet image, I waited to post ... waited until now ... waited for a rejection.


(Above:  To Laugh Often, detail.  Click on image to enlarge.)

The waiting ended yesterday.  To Laugh Often was not among the eighty-five accepted works ...
BUT CIRCULAR CHURCHYARD WAS !!! 
(Click here for a list of all accepted works!)

Yesterday I completed and submitted the eleven-pages of paperwork required for this preliminary acceptance into the show most art quilters consider "The Holy Grail".  Now ... to mail it off for the professional photographs that will appear in the exhibitions accompanying catalog.  I'm on cloud nine!