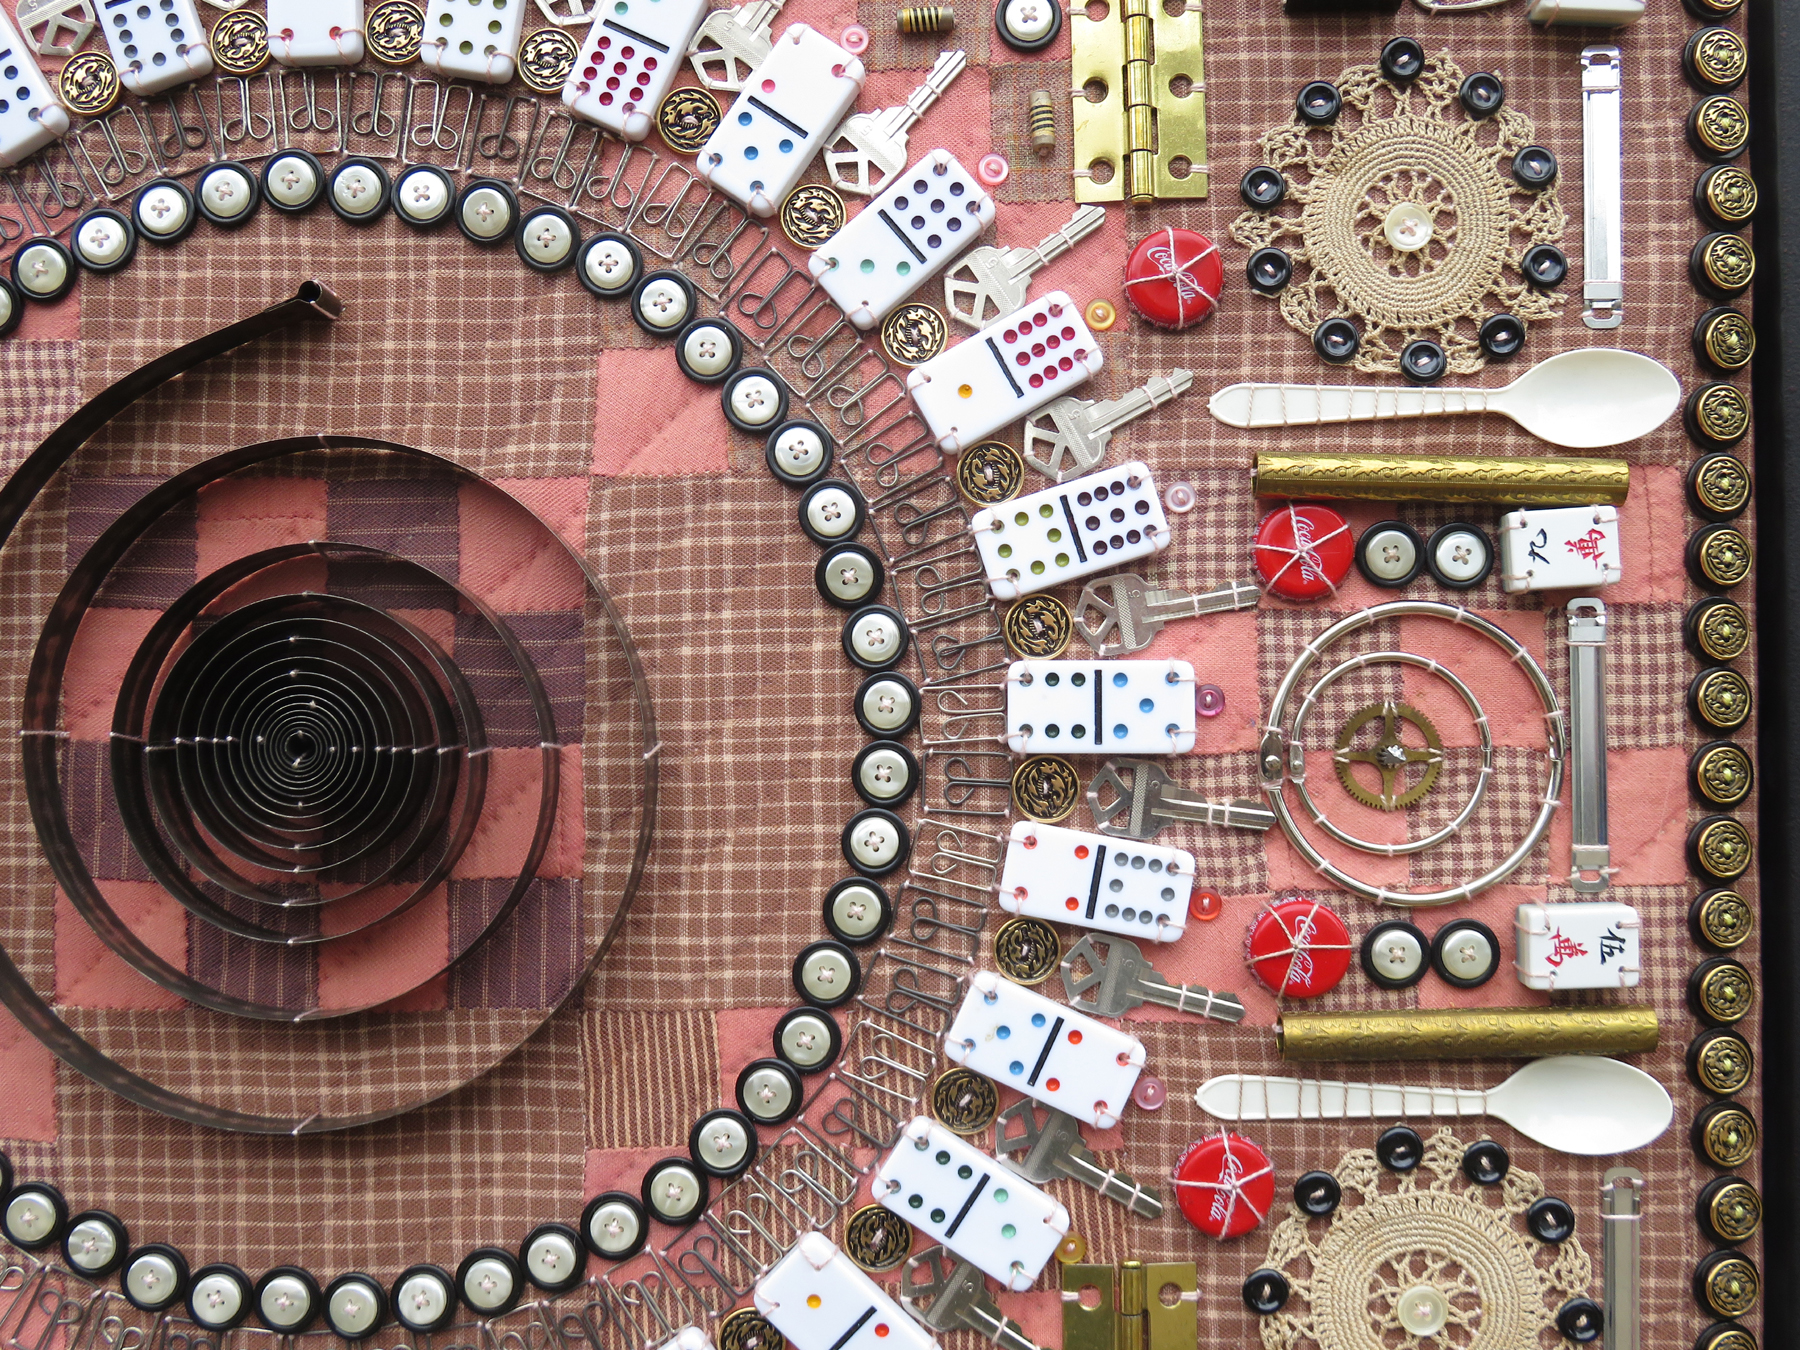
Tuesday, December 29, 2020

Bristlecone

(Above:  Bristlecone.  Framed: 25" x 21"; unframed 13 1/4" x 18". Digital image printed on cotton fabric and embellished by both hand and free-motion machine stitching.  Click on any image to enlarge.)

This past September I was lucky enough to be this year's Artist-in-Residence at Great Basin National Park in Nevada.  I'd applied last year ... about this time of year.  I remember applying because it was my great hope to return to Great Basin. My husband Steve and I had visited once ... a year earlier ... in June ... when trails at 10,000' in elevation were still under snow.  We didn't get to hike on a single trail but I was able to capture a few images from the parts of the road that were open.  One of these pictures was of a bristlecone.  The colors and textures of this ancient tree were magnificent.

(Above:  Detail of Bristlecone.)

In my excitement over being selected as the 2020 Artist-in-Residence, I went to Spoonflower and selected a couple of my digital images to be printed on cotton.  One of them was this detail shot of the bristlecone.  It was basted to a piece of felt. With great anticipation to see more bristlecones, I stitched on it during the three day drive west.  (Steve flew back from Salt Lake City.)  

While at Great Basin, I fell madly in love with the bristlecones, but my favorite trail was undoubtedly the 1.1 mile from the Summit Trailhead to Stella Lake.  Why?  Well, that trail is lined with aspen.  During my two-week stay, I got to see the changing of autumn colors and walk over scattered yellow leaves.  I was never on this trail without seeing mule deer.  It was magical.  As a result, I stitched one of the other Spoonflower printed images while in residency.  It is called Aspen.  I blogged about it HERE.  This piece became my donation to the park's permanent collection. 

(Above:  Me holding the finished piece.)

Even though I continued stitching on Bristlecone during the drive home (after picking Steve up at the Salt Lake City airport), I never finished it ... until this past weekend.  It got shoved back into a bag, one that I generally use for an "on-the-road" project.  I forgot about it.  Of course I did!  With this on-going pandemic, traveling is now a rare experience. 

(Above:  Lock Down 2020.)

This weekend, however, Lock Down 2020 had to be delivered to Spartanburg, a city in the northern part of South Carolina.  Even though I don't actually live in the "Upstate", the Artists Collective let me apply for their Art of Survival show.  It's a virtual fund-raiser.  People are asked to pay $5 to vote for their favorite artworks, all of which deal with the pandemic.  It was fun to drive somewhere, to deliver artwork again, and to participate in something that is also having a real show ... socially distanced, limited numbers of visitors, and masks required of course.  I'm hoping that the coming year will have many more such opportunities, but in the meantime, I took my "on-the-road" stitching bag and finally finished Bristlecone!  I'm glad I did.  I've always prided myself in finishing things!

Thursday, December 24, 2020

Mandala XXIII

(Above: Mandala XXIII. Hand stitched. Framed: 47 1/2" x 47 1/2" as a diagonal; 34" x 34" as a square. Antique brown-and-pink quilt section on which found objects have been stitched. Found objects include: white tiled dominoes; plastic spoons; Coke bottle caps; clock gears, parts, and a spring; crocheted pieces; buttons; loose leaf ring and flat paper binder; binder clips ; Mahjong tiles; owl-eyed vintage paper clips; white plastic rings; fountain pen nibs; keys; zipper pulls; Tinker toy wooden connectors; and brass hinges. Click on any image to enlarge.) 

I was a little apprehensive when starting this mandala.  All the others were created on vintage quilt sections made up of lighter colored fabrics.  I wasn't sure the found objects would stand out as well.  Contrast was needed.  Then, I found a set of white tile dominoes.  Once I put the clock spring in the middle, the rest of the piece came nicely together. 

(Above:  The quilt section stapled to a stretcher bar and having salmon color tulle put over the surface.)

The front of this antique quilt seemed to be in good shape, except for one stain.  The back, however, is very, very fragile.  Some of the reverse is actually gone, exposing the cotton batting.  I cut the quilt up into various sizes, cutting around the stain.  As a result, I am already stitching on another section that will be this same size.  There will be two smaller, nine-patch sized pieces and two single motif pieces.  Before stitching, I put a layer of salmon colored tulle over the surface.  This seems to unify the colors of the quilt, almost like a watercolor wash.  Yet, it is also a protective barrier for the old fabric, something that protects the old, hand stitched piecing.

(Above:  Ernie helping stitch the mandala.)

The tulle also makes it rather easy to remove any cat hair! LOL! 

This mandala can be hung as either a diamond or a square.  I've stitched my name on a diagonal in the lower, right corner.

Today I took photos.  Thankfully, it is nicely overcast this morning.  We are expecting plenty of rain later this Christmas Eve day.  The detail images are below!  Happy Holidays!


Thursday, December 17, 2020

Greetings cards and Inventory Reduction

(Above:  Twenty dozen greeting cards made from artwork that was cut up over the weekend.  Click on any image to enlarge.)

Although I don't always make specific New Year's resolutions, I am generally inclined to review the waning year in anticipation of the coming one.  This pandemic year has certainly been different, and next year promises to be unlike anything before it, largely a mystery due to so many circumstances that are still out of anyone's control. 

What is in my control is my studio art practice.  During 2020, I sort of went from being "productive" to being "super productive".  Most of what I made was shared here on my blog, on social media, and then went immediately into storage.  With galleries closed and no opportunities to show work, the issue of storage could no longer be ignored.  Something needed to happen ... sooner rather than later ... as a fitting ending to 2020 and a perfect way to start a new year.  So, this past weekend was all about "inventory reduction." 

(Above of the groups of a dozen greetings cards ... randomly selected for this photo.)

One might think lowering the price on older artwork is a great idea, but it really isn't.  If an artwork was priced at $200, it is supposed to be worth $200.  Slashing the price to $100 insults the value and cheats anyone who might have bought something similar for the original asking price.  Once upon a time during a monthly art walk, Steve and I bought a 6" x 6" mini canvas over which a young artist had poured dozens of layers of acrylic paint before carving into the thickness to expose the colors, a technique that resulted in a really sculptural surface, something like a geographic elevation map.  We paid $60.  The very next month, the young artist was moving from her studio.  She was selling everything 12" x 12" and smaller for $20 each.  Now, $60 isn't a lot of money but I felt totally cheated.  Besides, lowering the price doesn't necessarily mean I could move any of my older artwork.  What to do?

(Above:  Ernie the Cat helping to cut up older pieces in my African Series.)

Most of my older work is no longer framed.  Most has been shrink wrapped and sits in several rolling carts.  The carts are so full until this weekend it was difficult to even browse through the work.  I decided it was high time to simply "take them out of inventory" ... literally ... out of the shrink wrapping, out of the matting, and out of existence as part of that series.  The first series to go under my mat cutter was my African Series. (This link depicts two of the pieces.  Both were sold, not ones that got sliced up for greeting cards.)

(Above:  Ernie continuing to help by almost getting under the mat cutter himself!)

Once upon a time, there were at least twenty-two pieces in this series.  I only know this because I displayed that number in a show at USC-Aiken.  At the time, the press release read:
The Etherredge Center on the USC-Aiken campus will present an exhibition of mixed media work by Columbia artist Susan Lenz in its upper gallery from November 1 through 28, 2006. The exhibit, Masks and Markings, will feature twenty-two new works based on West African artifacts.

Susan Lenz’s interest in tribal art stems from travels to Kenya and has been fostered by visits to notable museum collections. She says, “I began working on this series as a result of a wonderful opportunity to photograph and sketch a truckload of African artifacts. I admire the craftsmanship of people who use materials in their midst, the notion that each tribal member is an artist in his own right, and the function of creativity in spiritual matters. I am seeking to interpret these images using the materials with which I have always worked, with the understanding that my lack of a formal arts education is not a deterrent but possibly a “tribal” bonus, and in the spirit of experimental creativity. Each piece provides an opportunity to try a different approach or application order.”

The work includes collaged polyester sheers and velvets, Expanda-paint, oil pastels and crayons, silk filaments, snippets of threads, and free-motion machine embroidery. Some also include hand stitching, beads, textural gels and paint. The series is on going.

(Above:  At least five or six pieces cut into 4 1/2" x 3 1/4" inch rectangles to be used for greeting cards.)

It was not hard to cut up these pieces. In fact, it was rather cool to see successful compositions in these small pieces.  It was so much fun that I tackled other, older work.  Almost everything that was left from the Sun and Sand show of 2012 was cut up.  Then, any of the remaining flower pounded paper pieces were ripped up to fit the cards.  Two of the PLAYA Series was next. An old experimental "In Box" piece was dissected into ten cards and another embroidery into ten more.  A series of nails rusted onto damask with dense running stitch worked out very well too, and there were a few odd pieces that became a few more cards.  Each piece was free-motion stitched to the front of a card.  I signed each one on the back of the artwork. 

(Above:  Cards, sorted into piles by the pieces cut up.)

More than fifty pieces were removed from inventory.  I stacked them by series or by the cut piece until I had more than a dozen different types.  Then, I randomly selected twelve different cards per group, tied a blue, wired ribbon around them (along with twelve appropriately sized envelops), and will now attempt to sell them.  Steve and I discussed a fair price.  Each group of twelve envelops and cards are $100 plus South Carolina sales tax (because South Carolina is one of those pesky states that insist on sales tax regardless of where they are going) but INCLUDING shipping inside the USA.  It's $20 more to ship to Canada.  It's $30 more to anywhere else in the world.  If you are reading this and want to make a purchase, just email me at mouse_house@prodigy.net with your mailing address.  I'll send a PayPal invoice.  You don't have to have a PayPal account to use their system.  If this works out, I'll be reducing more inventory in the future. 

Wednesday, December 16, 2020

COVID-19 Firescreen

(Above:  Detail of COVID-19 Firescreen.  Click on any image to enlarge.)

It's been just over a full week since I posted, but that's not because I haven't been working!  Far from it!  I've been painstakingly surrounding cross-stitched motifs with very tiny satin stitched borders ... for days and days and days.  It has, however, been a labor of love.

(Above:  COVID-19 Firescreen.  29" x 22 1/2" x 6 3/4".  Antique wooden firescreen with altered cross stitch.)

I bought the firescreen months ago at Bill Mishoe's auction.  At the time, I was bidding in person.  So, this had to have happened sometime in January or February.  After that, Bill Mishoe's auction was like every other non-essential business:  Closed for the pandemic.  More recently, Bill has been holding silent auctions ... the sort where every item or table lot has a sheet on which bids can be written by registered bidders.  (I have a permanent number: 74)  People can come during regular business hours to bid on items.  Bidding closes every other Wednesday at 5:00 PM.  I have no idea why I bought this firescreen.  Perhaps, no one else wanted it.  I got it at the opening bid:  six dollars.  The firescreen featured an embossed piece of thin leather.  It was water damaged.  If I had a thought about this firescreen, it was likely an idea to alter it with some sort of fabric or quilt.  Yet, a plan didn't present itself until last month.

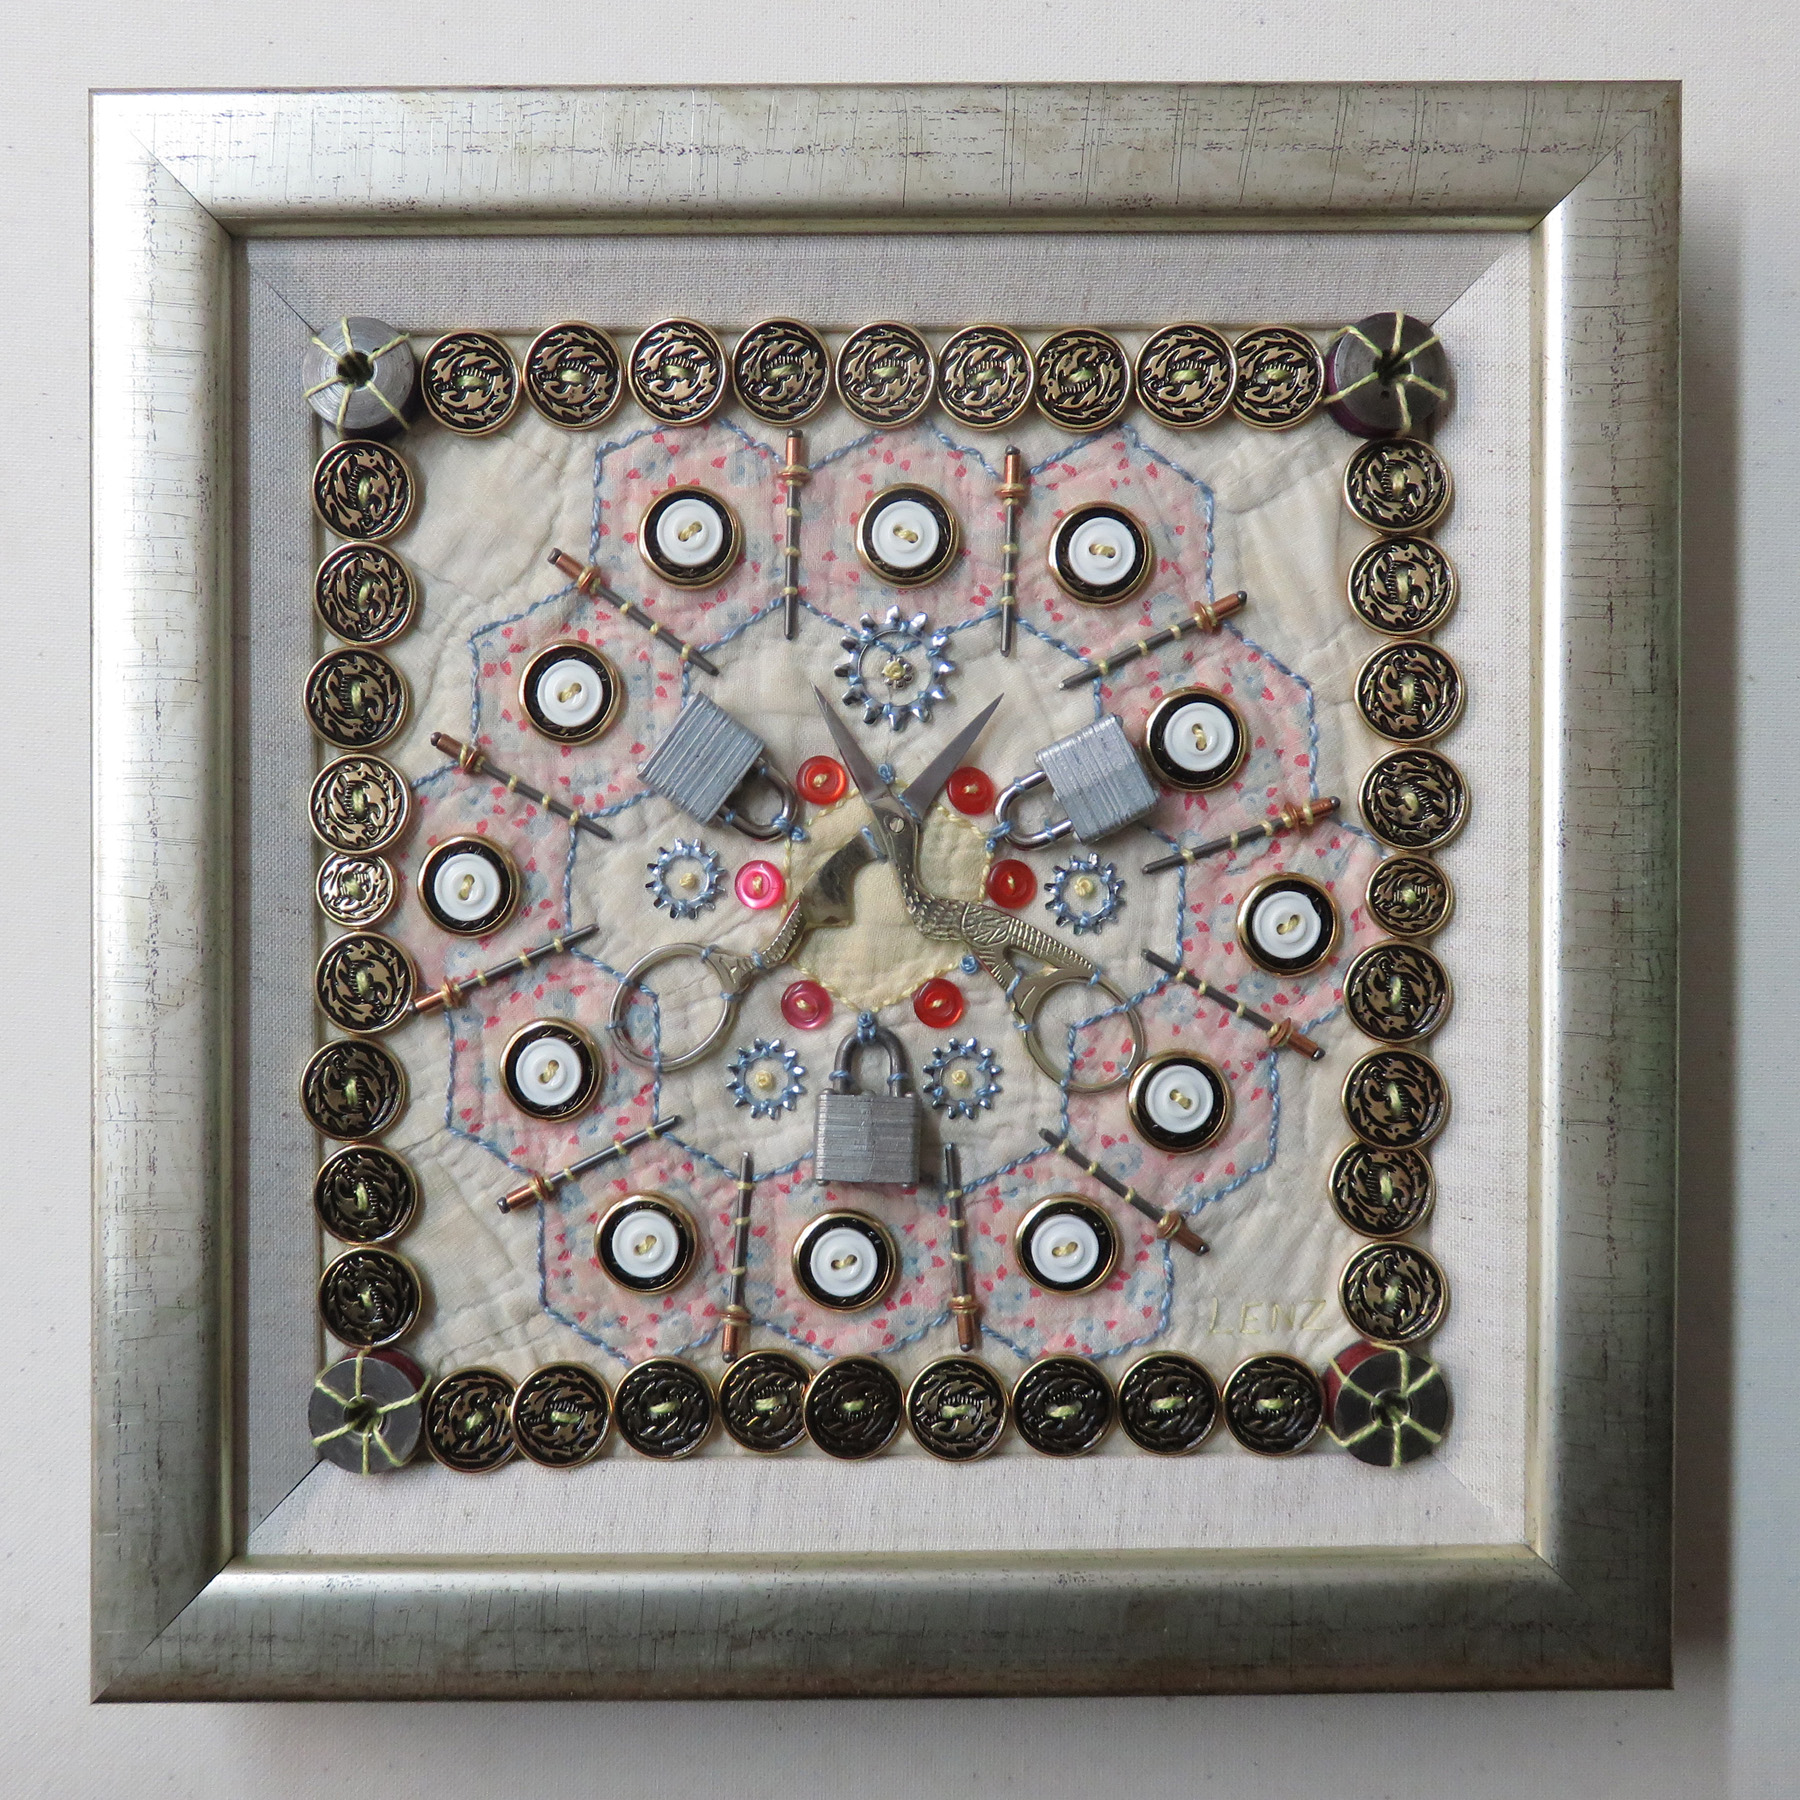
(Above:  A cross stitch bought at another Bill Mishoe auction.)

Last month I went to one of Bill Mishoe's silent auctions.  I previewed early in the week and then went on Wednesday, right before the 5:00 deadline for bidding.  There were lots of people there ... too many (even though everyone was wearing a mask).  I checked the few items on which I'd written my bids and was about to leave.  Hanging on the back wall was a beautiful cross stitch.  It was very nicely framed (and as a professional framer, I ought to know!)  I could tell that it wasn't mounted to sticky board.  There were spacers to keep the UV glass from touching the threads.  The needlework was impeccable, done on 36-count even-weave linen. No one had written a bid.  

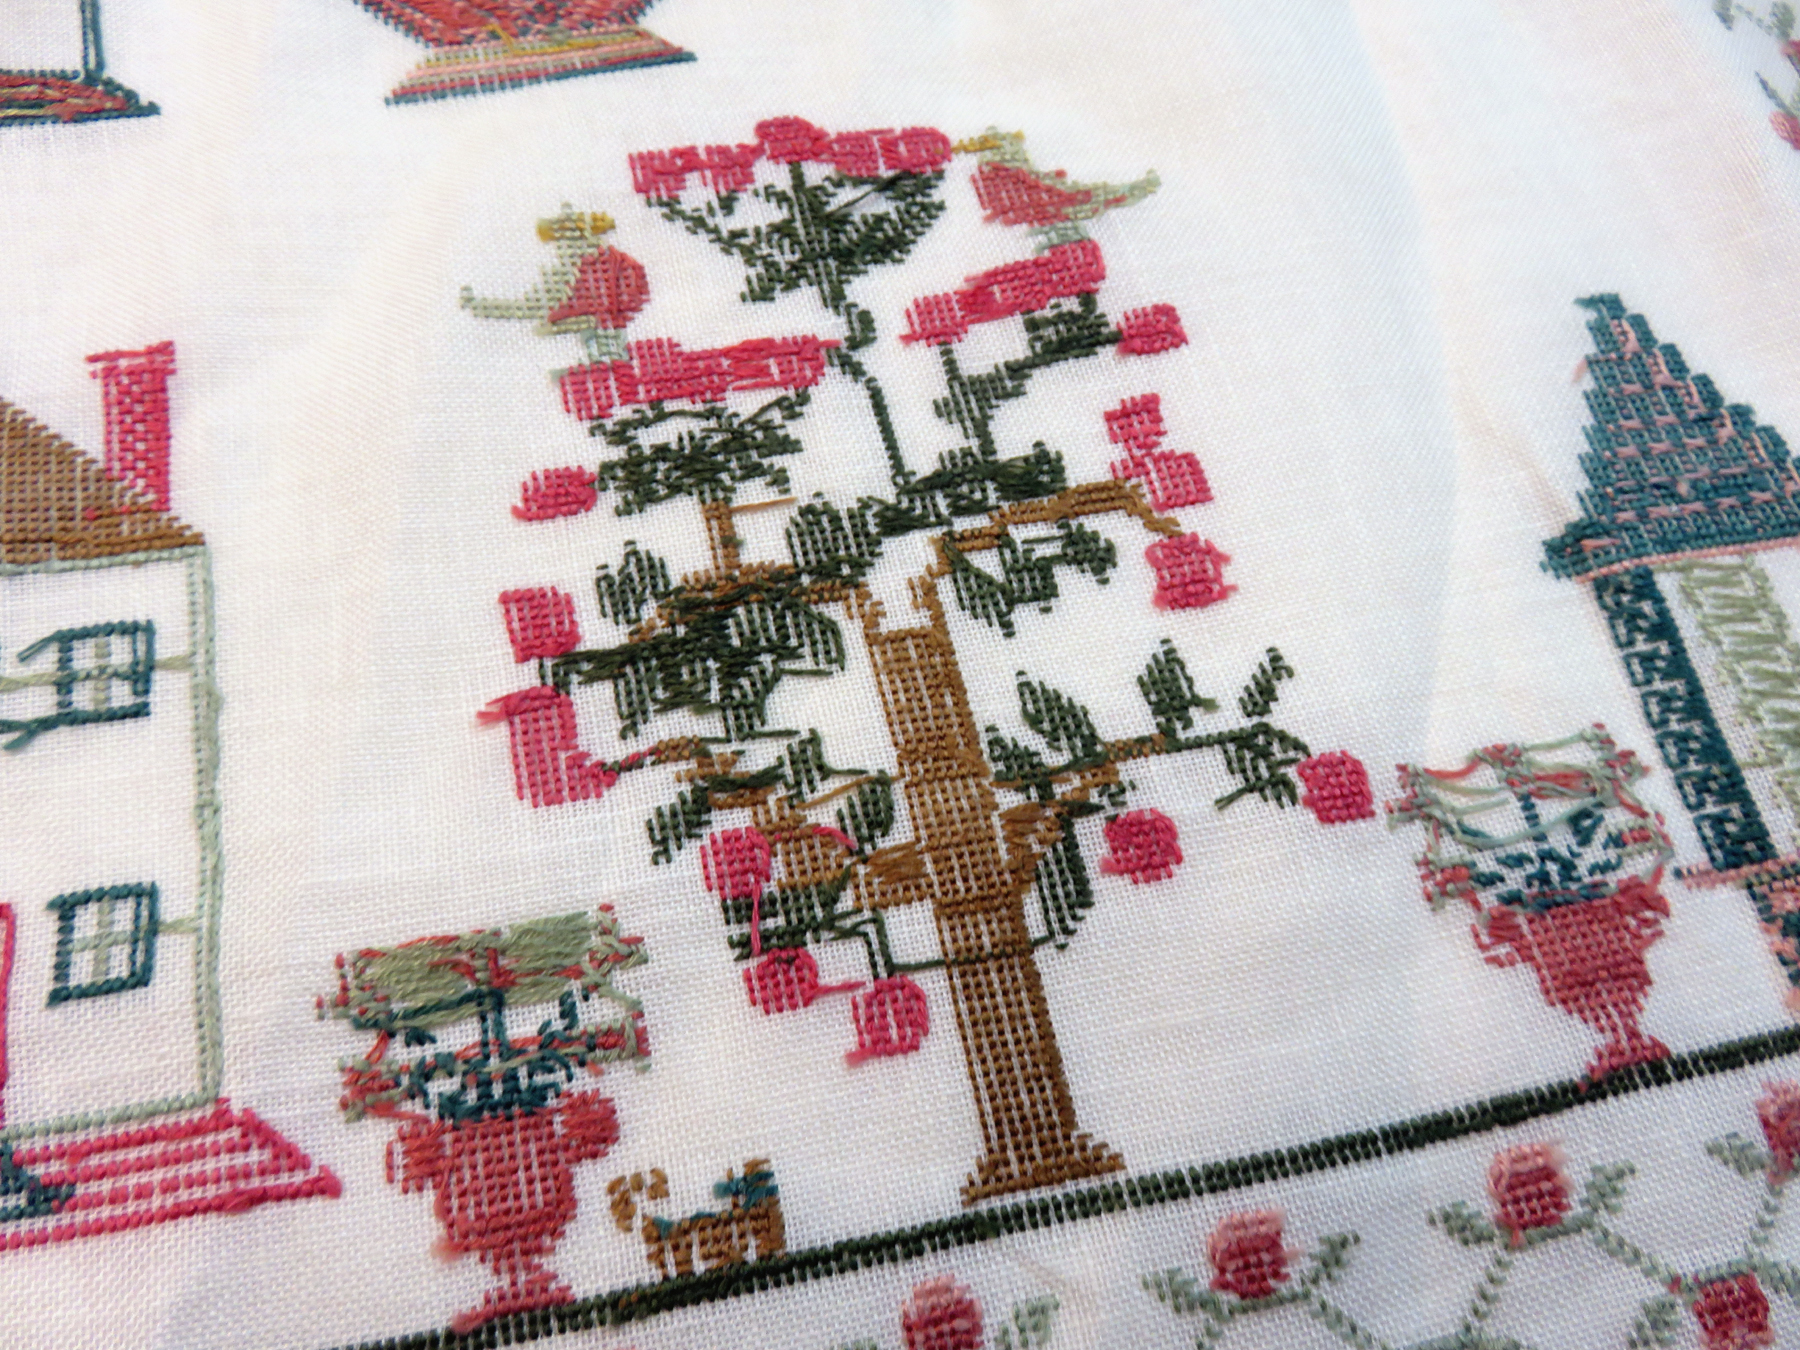
(Above:  Detail of the cross stitch.)

My heart sunk for the woman who spent untold hours on this piece ... in 2003.  That really isn't a long time ago at all ... just seventeen years.  Now ... I know that there are plenty of sound reasons why a family doesn't want or can't keep all the things they might inherit.  I've talked about this during my TEDx talk called Precious: Making a Plan for Your Precious Possessions.  I listed possible excuses:  family living too far away, houses already filled with other precious possessions, down-sizing the homes of older relatives who need assisted living, or being forced to get a house ready to go on the market after someone unexpectedly dies.  People often have to make these decisions right when they are overwhelmed and grieving.  That's how lots of things end up at thrift stores and tag sales and at Bill Mishoe's auction.

(Detail of the cross stitch from the back.)

Generally, I have a sad understanding about these things.  I get it and actually have empathy for those who consign things that seem like they ought to be kept forever.  I know that everything can't be saved.  Everything isn't going to make it to the next generation ... but this cross stitch.  Well ... I just couldn't stand the idea of it going without a bid.  I couldn't stand this piece not being loved and admired and getting a second chance as ART.  So, I bid the minimum, a "mercy bid":  Six dollars.  No one upped me.

(Ernie and me ... working on the piece.)

At the time, I had no plan for the cross stitch. Frankly, I hoped that my mercy bid would start the ball rolling.  Others were supposed to fight over this gorgeous needlework.  In my mind, I wasn't supposed to end up with it, but I did.  It seemed like two pieces without a plan became an idea for one whole, altered artwork.  I took apart the firescreen.  The damaged embossed leather pulled easily away from the thin plank of wood to which it was once glued.  I used the wood to trace an outline on a piece of golden colored brocade (a piece of fabric from my stash that probably came from an early Bill Mishoe auction.)  Wonder Under was ironed to the reverse of the cross stitch (to prevent raveling).  I cut the motifs apart and arranged them on the fabric.  My stash of thread (almost all of which came from other auctions) includes plenty of Paternayan tapestry yarn.  Ecru and light tan were selected.  The tan went around the green lettered alphabet.  The ecru went around the motifs.  First, however, I removed the woman's name and her date.

(Above:  COVID-19 Firescreen, detail.)

I replaced the date with 2020 and stitched the words "Coronavirus Pandemic Victims".  Historically, firescreens often featured needlepoint or other embroideries.  These elaborate pieces were not used to catch a spark or prevent a hot coal from rolling out into a room.  Wire mesh fire screens do that!  The decorative fire screens were for shielding people from the intense heat when sitting near the fireplace.  They were a form of temperature control. 

(Above:  COVID-19 Firescreen, detail.)

The original cross stitch was like many antique samplers which included funereal motifs:  Urns, a wreath, and words of remembrance. I don't know if the woman who stitched it has died but she had obviously been thinking about her own memory.  This year, her memory almost got entirely lost.  With my mercy bid, the piece might easily have been discarded.  Somehow in my mind, altering the cross stitch was fitting.  It now honors everyone lost this year, including the memory of the woman, a memory that escaped a fate of neglect.  This firescreen might never stand in front of a real fire, but it will be kept ... at least for now ... with remembrance for many.

(Above:  COVID-19 Firescreen, detail.)

When the last wool satin stitch was plied, I used Yes Paste to glue it to the wooden plank.  Yes Paste is awesome.  It is acid-free, flexible, slow drying, and cleans up with soap and water.  I coated the wood with a thin layer and positioned the embroidery on the wood.  I had to move the fabric around quite a bit to get it lined up ... but Yes Paste allows for this. No problem.  When I finally had it right, I put a piece of Plexiglas over the wood and weighted it down overnight.  The next morning, I cut away the excess fabric and installed the panel back into the firescreen. 

Tuesday, December 08, 2020

Four Small Mandalas

(Above:  Mandala XIX. Framed: 11 1/4" x 11 1/4".  Single motif from a vintage Grandmother's Flower Garden quilt onto which are stitched buttons, clock gears and parts, Oriental brass picture hangers, loose leaf ring binders, metal washers, parts of large snap fasteners, small safety pins, and an early 20th century medal. Click on any image to enlarge.)

When I cut up the old, slightly tattered Grandmother's Flower Garden quilt, I had a these four individual motifs still whole and decided to make these tiny mandalas.  It was really fun and a great way to use some of the single or double items I have.  Generally, I need at least four, six, eight, twelve, or sixteen of everything used.  Multiples are needed but these little mandalas provide places for other trinkets.

(Above:  Mandala XVIII.  Framed: 11 1/4" x 11 1/4".  Single motif from a vintage Grandmother's Flower Garden quilt onto which are stitched buttons, stork scissors, three little locks, strange metal pins (that I have no idea what are), external foot washers, and sewing machine bobbins.)

I have already cut up the next vintage quilt.  It is quite different.  It is mainly nine-patches in pink on a dark brown background.  Thus, the next challenge is one all about light-and-dark and strong contrasts.   

(Above:  Mandala XX. Framed: 11 1/4" x 11 1/4".  Single motif from a vintage Grandmother's Flower Garden quilt onto which are stitched buttons, zipper pulls, clock gears, Oriental brass picture hangers, loose leaf ring binders, keys, and vintage owl shaped paper clips.)

My husband Steve went with me to Joann Fabrics to select a netting to go over the entire surface of the coming mandalas.  I used a gray netting for all those made on the Grandmother's Flower Garden quilt but it looked dull on the dark brown. We put a large section of the quilt on the floor and played with several shades of netting ... right in the store's aisle. Thankfully, the manage knows that I'm "an artist".  Amazingly, a salmon colored netting looked better than any tan, pink, or brown. 

(Above:  Mandala XXI. Framed: 11 1/4" x 11 1/4".  Single motif from a vintage Grandmother's Flower Garden quilt onto which are stitched buttons, clock gears, safety pins, small keys, and another early 20th century medal donated to my stash from a friend in Wyoming!  Thank you, Phillippa Lack!)

Even though I'm otherwise "ready to stitch" on the next mandala, I'm taking a break. I'm stitching on something else and it is going very, very well.  I think that switching from one concentration to the next and back again is one of the important ways that I maintain my engagement with my various series.  Nothing ever gets boring.  While stitching on one idea, I'm thinking and/or rethinking about another project.  Everything seems new and exciting when approached this way!
 

Saturday, December 05, 2020

Mandala XXII

(Above:  Mandala XXII. 42" x 42" as a diamond; 30" x 30" as a square.  Found objects stitched to a section of a vintage Grandmother's Flower Basket quilt.  Found objects include: keys, clock gears, zipper pulls, clothespins, paper clips, metal washers, loose leaf binder rings and flat paper binders, film reel, chop sticks, buttons, beer caps, and wooden Mahjong tiles.  Click on any image to enlarge.)

This is the fourth and last large mandala made on the vintage Grandmother's Flower Basket Quilt. There are, however, four small, single-motif mandalas that are finished and in the process of being framed.  I'll share them later.  Anyone following this series knows that I have been challenging myself with each piece.  Those made on the Grandmother's Flower Basket quilt presented unique challenges due to the lack of horizontal and vertical symmetry.  Basically, the "flower basket" motifs just don't line up that way; they line up only on the diagonals.  

(Above:  Mandala XXII, detail.)

On the last, large mandala, six plastic spoons were positioned at an angle.  They created a sense of motion and took a viewer's eye away from the asymmetrically aligned motifs.  I liked the effect so much that I wanted to expand it.  Twelve chopsticks did the trick.  Quickly, my husband and I started referring to this mandala as a pinwheel. 

(Above:  Ernie making sure the pinwheel stayed in place so that I could continue stitching.)

Of course, Ernie had to help with this piece.  In fact, the more I stitched with Ernie, the more I realized that I didn't actually need to fill the outside corners (which was where Ernie often slept.)

(Above:  Mandala XXII, detail.)

So for the first time, I left the corners open.  For me, this solved another challenge ... a way to leave enough of the vintage quilt visible that viewers would recognize it.  


Sharing these mandalas has prompted many questions about my stash of found objects.  Mostly, others want to know how I've come across so many multiples.  Well ... my collection comes mainly from Bill Mishoe's weekly auction. Until this year and COVID-19 restrictions, Bill Mishoe held two auctions every week. Friday night was for "better items and real antiques and furniture". Tuesday was for "used household items" generally sold by the "table lot".  What's a "table lot"? It's everything that was loaded on and often under a card table.  These table lots are generally the result of downsizing ... because a person recently died, was going into an assisted living situation, or was moving across country.  Some lots come from storage units with long overdue bills. There are lots of reasons why a table is piled full of things ordinarily found in a linen closet or a pantry or from shelves in a garage.  There are lots of flea market and antique mall dealers at a Tuesday night sale.  Like them, I sort through the remains of other people's lives.  I'm not searching for retail; I'm searching for wooden spools, bobbins, buttons, and the precious things some anonymous woman once cherished. It is my job to give these items a second life.  During the pandemic (after closure orders ended), Bill Mishoes started silent auctions. The photo above shows a sewing basket that became mine about two weeks ago.  It was one item on a table lot.  I got it and everything else on the table for a whopping six dollars plus 10% buyer's premium.  Most of the stuff on the table (chipped plates, cheap holiday decorations, and ugly knickknacks) went into our dumpster.  There was a brand new space heater. It went into our garage.  There were two unopened boxes of ink pens and several boxes of envelops. They went into our office.  We gave away a perfectly good, glass-covered cake stand and a wall display unit (still in its box).  All I really wanted was the sewing box with more than thirty wooden spools.  I had no idea that I also got three boxes of metal paper fasteners ... but I did.  Twelve of them are now on Mandala XXII.  The plastic rings (which I didn't see when bidding) will be used this way too.  I'd like to think that the woman who once owned this sewing box is happy knowing that the things she used are finding a place in today's world as art!  

(Above:  Ernie supervising the framing of Mandala XXII.)

As art, these mandalas are also all professionally framed.  It is, however, a challenge!  Some of these pieces have parts that extend beyond the relief of the picture framing moulding.  It is necessary to raise the piece off our work table.  We use the red plastic containers holding screws and mirror hangers, one under each corner.  Ernie thought this was a game.  He seriously wanted to crawl under the piece! 

  
(Above:  Mandala XXII, detail.)
 
Here's another image of Mandala XXII.  The Mahjong tiles also came from Bill Mishoe's auction.  Unlike the metal paper fasteners, I bought them specifically for use on these mandalas.  I don't know who once owned them, how old they are, or how to play the game.  I do, however, know how to drill tiny holes in all four corners and stitch them down!


Thursday, December 03, 2020

Altered English Pub Trays

(Above:  An altered, English pub tray.  12" circle.  Collage of antique prints and letters clipped from various ephemera.)

The other day I was deep into an experiment, using artist-grade epoxy and unraveled thread.  It was exciting, especially since it worked out perfectly. (Blogged HERE.) Yet, I did something else at the same time.  Why?  Well, artist-grade, UV filtering epoxy is expensive.  A two-gallon kit runs almost $120 plus shipping.  As such, I never want to waste any of it.  When setting up an epoxy pour, I always have a few things on hand for any excess epoxy.  The other day, I knew I wanted to pour at least a little dribble over the white-lined sphinx moth that I found on the way to Nevada and used for a program called "Art in the Dark" while an artist-in-residence at Great Basin National Park.  That specimen was perfect and found at a most serendipitous time.  I brought it home in a plastic container and have ever since been meaning to affix it inside a porcelain container with epoxy.

(Above:  The white-lined sphinx moth ... set with epoxy in a lidded, porcelain container.  To read how it figured into the "Art in the Dark" presentation, CLICK HERE.)

Both the moth and the container were in a back room used to store "stuff" ... lots and lots and lots of stuff that I've purchased over the years from Bill Mishoe's estate auction.  This is the bulk of my found art object stash.  When I went to retrieve them, I found a small stack of English pub trays.  They weren't with the larger stack ... a stack numbering more than fifty.  At that moment, I vaguely remembered collaging antique and vintage images cut from magazines and books into these trays.  This was done well over a year, perhaps two years, ago. It occurred to me that epoxy was under consideration at the time ... but I never did it.  I grabbed the moth, the porcelain container, and just one tray ... assuming that I wouldn't have much more excess epoxy (and I didn't).

The next morning, I was almost surprised to see how nicely the tray turned out.  Later that afternoon, Steve and I poured another small batch of epoxy for the remaining seven.  They are not perfect ... but like any good experiment, I learned how I might do better in the future. Whether I do more or not doesn't matter. I learned something. I have drawers full of other antique images and at least forty more trays.  It wouldn't be hard to get more "metal appropriate" spray paint for the base.  There is, however, never enough time for all my hair-brained ideas!


Tuesday, December 01, 2020

Exposed Threads

(Above:  Me holding the finished experiment now known as Exposed Threads. Click on any image to enlarge.)

On and off for several years, I've been thinking of potential ways to use the leftover thread from my installation Threads: Gathering My Thoughts.

(Above:  Threads: Gathering My Thoughts while it hung at Gallery 80808 ... before being accepted for a solo installation at the Mesa Contemporary Art Museum in 2016.  Click HERE to see that show.) 

There are three, giant leaf bags filled with thread in a downstairs closet.  Keeping Ernie, our new cat, out of the closet made me revisit some of these thoughts ... which were truthfully more fantasy than anything approaching a workable plan.  That is ... until now!  An idea occurred that I couldn't resist.  I had to act on it even though it was really just an experiment.  After all, it might not have worked ... but it did!

 
Above:  A composite image showing a 24" x 14" frame in which a piece of Plexiglas was sealed in place.  Clear, waterproof caulking was used ... and because the lip of the frame is so narrow, some of the caulking was smeared along the perimeter of the Plexiglas ... as if a slightly blurred transition from the frame its coming contents.
 
 
Everything needed was gathered into the garage.  The work table was covered with plastic.  I got in my Tyvek suit, disposable gloves, and carbon filtering ventilator mask before stirring the two-part epoxy from one container to the next.  This is an artist grade, UV filtering epoxy that doesn't yellow over time.
 
The frame was put on four wooden blocks.  This was done to prevent any leaked epoxy from sticking the entire project to the table.  Thankfully, the frame did not leak!  I poured the epoxy, tilted the frame to achieve an even coating, and then ...
 
... changed into a new pair of disposable gloves before piling the thread onto the epoxy coated surface.
 
 
The idea was that the threads on the bottom of the mass would become saturated with epoxy but that the threads on the top remained looking "exposed".  I kneaded the threads, making sure they covered the entire area.  Steve even took a very short video.  It is HERE.  When all the threads seemed adequately "massaged", we left the experiment to cure overnight.
 
(Above:  A composite image of the finished piece.)

By morning, the epoxy was hardened.  The piece was held upright, shook while upside down, and blown with a stream of air from our air compressor.  Success!  The threads held in place even though the surface looks just like ordinary, unraveled thread.  The means of attachment aren't obvious or even visible!

 
The detail shot is great too.  It really shows the beauty in all this colorful chaos!
 
What's more, the other side of the piece is pretty cool too!  This is the front of the frame but the back of the exposed thread.

The detail from that side is equally cool!  Now ... to decide where to take this experiment!  Ah, the possibilities are endless.  There is hope to reclaim the downstairs closet!