Friday, January 29, 2021

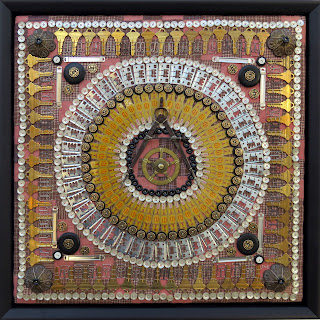
Mandala XXVIII

(Above:  Mandala XXVIII.  24 1/2" x 24 1/2".  Found objects hand stitched to a section of an old quilt. Found objects include:  rotary telephone dial, metal picture frame hangers, buttons, laminated Tampa Nugget cigar bands, keys, dominoes, paper fasteners, four pieces of glass from two vintage lamps, needle threaders, and metal jump rings.  Click on any image to enlarge.)

After completing Mandala XXVII, I thought to myself, "Susan, you could reverse the rings of cigar bands and metal picture frame hangers ... making the larger, outer circle from the cigar bands and the smaller, inner circle from the hangers." I set about doing this without having the slightest idea what I'd use for the central focal point. 

 
(Above:  Detail of Mandala XXVIII.)

I still had no idea what would be stitched in the middle when adding rings of buttons.  Finally, I took the piece into the room where I keep my stash of "junk".  Amazingly, the yellow rotary telephone dial fit perfectly in the center.  It was as "meant to be".  Quickly, a few holes were drilled and the piece stitched in place.  These moments of serendipity seem to occur all the time


(Above:  Detail of Mandala XXVIII.)

While in the back room of "stash", I also found two broken lamps.  After dismantling them, I had four nice, glass rings that were part of their stems.  Perfect for the corners.

(Above:  Ernie helping!)

To stitch the very outside of some of these mandalas, I have to remove them from the stretcher bar because the edge is impossible to reach.  Ernie has gotten so big that he can only sit on my work when it is off the stretcher bar.  He is now only helping with the last part ... the edges of buttons and old keys!  Ernie has, however, inspected just about every items before it gets stitched down!  He's King Cat of the stash room!

Wednesday, January 20, 2021

Mandala XXVII

(Above:  Me and Mandala XXVII hanging on the garage door.  Click on any image to enlarge.)

Several weeks ago, I cut up this old, tattered pink-and-brown quilt into squares for future mandalas. I ended up with two large ones (finished!), two small ones (finished), and two medium sized ones.  This is the first of the two medium pieces.  There were two moments of pure serendipity that determined the objects on this one! 


(Above:  Donation from a cyber friend.)

First, a cyber friend sent me an entire shoe box of wooden thread spools.  She knew I transformed them into Christmas ornaments.  Some of these belonged to her mother's mother.  As much as I am in her debt for such a grand gift of thread spools, I was immediately taken by the antique mechanical compass that was also in the box.  Why a moment of serendipity?  Well, the delivery man brought the box just when I was stapling the medium-sized quilt section to its stretcher bar. At the time, I was thinking, "What will be a good focal point?  What unusual object should set this mandala apart?"  Then, I opened the box and found it!

(Above:  Mandala XXVII. 24" x 24". Found objects hand stitched to a section of an old pink-and-brown quilt. Objects include:  An antique mechanical compass, a clock gear, laminated Tampa Nugget cigar bands, buttons, metal picture framing hanging devices, paper fasteners, brass lamp fixtures, keys, and owl-eyed vintage paper clips.)

The other moment of serendipity was finding a Ziploc bag of Tampa Nugget cigar bands at a local antique house.  The whole bag set me back just four dollars.  I bought them, of course, because they are multiples.  I need multiples, but I can't really use "paper".  What was the moment of serendipity?  A framing client brought in an item for framing.  It had been laminated.  It didn't need glass; it was protected from the elements.  This was sort of a "dah" moment for me.  I realized that I could laminate the cigar bands!  They really could get appropriately stitched to a mandala.

(Above:  Some of the 390 laminated cigar bands.)

I went to FedEx Office.  The staff was very nice.  They provided me with the folded, letter-sized laminating sheets.  I sat at a cubicle and inserted three rows of thirteen cigar bands on ten sheets.  One by one, the staff put them through their machine.  Okay ... it took hours and hours to cut them all out, but it was worth it.  Putting a stitch directly through the lamination was next to impossible.  I used a hammer and nail to poke a tiny hole in each end of each cigar band ... but again ... it was worth it!

(Above:  Detail of Mandala XXVII.)

Needless to say, I have plenty more cigar bands for future mandalas.  I'm already stitching another circle on the next mandala.  After that ... well ... I hope a bit of serendipity comes into play again because I haven't found the next tattered quilt!  I'm sure it will come to me! (Fingers and toes are crossed.)

Monday, January 18, 2021

New and Blue

(Above:  Selection of newly stitched blue and purple fiber vessels. Click on any image to enlarge.)

Recently I finished twenty-one new fiber vessels and posted them both here on my blog and on Facebook.  A couple sold.  I was thrilled.  Then, my cousin requested one of the only ones that sold.  It was blue.  It seems that blue appeals to more people than any other color ... which is strange to me.  It is the color to which I navigate least!  In order to appreciate "blue" better, I decided to make two big balls of cording.  One ball was larger and in darker shades of blue: indigo, royal, navy, lapis, and denim blue.  One was smaller and lighter:  cerulean, Carolina, cornflower, and sky blue.  I decided to make each and every fiber vessel slightly different and offer them to my cousin ... first refusal.  The resulting fiber vessels are below ... and all but one are now for sale! 

(Above:  Cerulean. 5 1/4" x 7 1/4" x 7 1/4". $60.)
(Above:  Cerulean with metallic pewter thread and rim. 6 3/4" x 7" x 7". $65.)
(Above:  Cerulean blue with purple metallic thread and rim. 6 1/4" x 8 1/4" x 8 1/4". $70.)

This is the one my cousin selected!


(Above:  Indigo with royal blue rim. 6" x 8 1/4" x 8 1/4". $65.)

(Above:  Purple with purple metallic thread and rim. 6" x 7 3/4" x 7 3/4". $65.)
(Above:  Small indigo exterior and purple interior. 4" x 6 1/4" x 6 1/4". $45.)
(Above:  Variegated blue/purple exterior with metallic pewter thread and rim, indigo interior. 6 1/4" x 7" x 7". $65.)
(Above:  Variegated purple exterior and rim with indigo interior. 6 1/4" x 7 3/4" x 7 3/4". $65.)
 

Saturday, January 09, 2021

Mandala XXIV, XXV, and XXVI

(Above: Mandala XXIV. Framed and hung as a diamond: 47 1/2" x 47 1/2"; as a square: 33 1/2" x 33 1/2". Found objects hand stitched to a corner of an old quilt. Objects include: Glass flower frog, aluminum cookie cutters, rivets, buttons, metal frame hanging devices, keys, clock gears, paper fasteners, a set of eight vintage cheese knives, a set of eight vintage metal coasters, red Tinkertoy sticks, vintage cocktail food picks, bread bag closures, and clip-on earring findings.  Click on any image to enlarge.) 

Many readers have expressed amazement at the number of multiples I have in my stash.  I do admit having two buckets of old keys and more buttons than an average sewing shop, but I also have to admit that some of my stash is now feeling a dent.  The boxes of two-hole brass buttons are getting low. Honestly, I never thought I could use them all but apparently this is happening.  In fact, I am now actively looking for multiples of unusual (or even common!) things.

(Above:  Me with Mandala XXIV, sitting in front of my art quilt, Second Marriage.  This photo was taken to show size and scale.  One of the things learned during the pandemic was how to best present artwork on-line ... as opposed to "proper" art images.  Apparently, this is a good idea even though I hate being in front of the camera!)

Recently I went to two, local antique malls, Red Lion and Old Mill. I found several interesting items including the black coasters, aluminum cookie cutters, the set of cheese knives, more dominoes, and a container of 100 assorted cocktail picks.  I also bought a Ziploc bag with 390 Tampa Nugget cigar bands.  How do I know the correct number? Well, I spent quite a bit of time getting them laminated and cutting them out.  (Three columns of 13 fit on one lamination folder. I filled ten!)  They will be featured on an upcoming mandala.

(Above: Me holding Mandala XXV on the left and Mandala XXVI on the right).

Even before finishing Mandala XXIV, I was working on the two small pieces.  Why?  Well, when designing a large piece, there are objects that just don't work.  Almost always, there's a better place on one of the small mandalas.  Generally, I don't finish them all within a day of each other, but this week that happened.

(Above:  Detail of Mandala XXIV.  For more details of this piece, just scroll further down.)

Every time I finish one of the large mandalas, a reader asks about the weight of the piece.  It is assumed that "as a quilt" (especially an old, slightly damaged quilt like those I use), the artwork can't hang successfully due to the weight of the objects ... or at least, it can't hang for long before parts start sagging and/or fabric rips.  Well, I solved potential disaster long before I stitched the first mandala.

(Above:  Mandala XXIV, the back side.)

As a certified, professional picture framer, I am used to shadow-boxing all sorts of heavy items for wall-mounted display.  It is important to distribute the weight.  Each mandala has been stitched while stapled to a stretcher bar.  It is then removed.  A piece of acid-free foam-centered board is glued to the face of the stretcher bar.  Then, the piece is re-stapled to the stretcher bar.  Finally, I use buttonhole thread to stitch through the foam-centered board and the quilt.  Running stitches are every two to three inches apart, both vertically and horizontally.  In order to make sure the glass flower frog stay firmly in place, I used #3 perle cotton.  This was the same thread originally used to stitch it to the quilt. By stitching a second stitch around the outer ring, the flower frog is now attached to both the quilt and the foam-centered board.

(Above:  Mandala XXV. Artwork: 10 1/2" x 10 1/2"; framed and hung as a diamond: 20 1/4" x 20 1/4"; hung as a square: 14 3/8" x 14 3/8". $225.)

The two small mandalas went together easily.  Mandala XXV includes sewing machine bobbins, dominoes, keys, a clock gear, buttons, and hinges sent by a very nice reader!

(Above: Mandala XXVI. Artwork: 10 1/2" x 10 1/2"; framed and hung as a diamond: 20 1/4" x 20 1/4"; hung as a square: 14 3/8" x 14 3/8". $225.)

Mandala XXVI includes a clock spring, keys, buttons, and zipper pulls sent by another reader plus plastic pull tabs sent from yet another, new friend.  Believe it or not, the clip-on earring findings came from someone else!  I'm very fortunate to have plenty of people adding to my stash!  THANK YOU to each or you.  I'm always happy to accept these strange things and try to incorporate them into my studio practice.  For the things I can't use, I do my very best to place the items where they will get their "second life".    

(Above and below:  Detail images of Mandala XXIV.)

Stuff can be mailed to me at Mouse House, Inc., 2123 Park Street, Columbia, SC.  I know that by writing this here, I might be opening a can of worms ... but I'm up for the challenge!


Monday, January 04, 2021

New Fiber Vessels

(Above:  An assortment of recently stitched fiber vessels.  Click on any image to enlarge.)

During the past two weeks, I've been busy in my studio making cording and then zigzag stitching it all into a new collection of fiber vessels.  So many were finished that I couldn't quite arrange them in a single photo!

(Above:  More recently stitched fiber vessels.)

There were several reasons for turning my attention to this.  First, the Philadelphia Museum of Art Craft Show went virtual this past November.  I participated, created a unique sales oriented blog featuring these fiber vessels, and actually sold quite a few!  Thus, I wanted to replace them.  Second, a blog reader sent an email.  She had a couple questions regarding my free, on-line tutorial for making them. 

(Ernie the Cat ... helping to unravel a small, green shawl with plenty of lime green fringe.)

Finally, I had a lot of fun unraveling a sweater and a small green shawl trimmed in lime green fringe.  Both were donated to my stash.  Ernie loved helping!

(Above:  Making the cording.  Lots of strands of yarn are first shoved through the cording foot of my Bernina.  Then, I zigzag over it.)

The tutorial mentions "six to eight" strands of yarn but I often have more.  Why?  Well, I'll use just about anything!  Some yarns are just thinner than others.  Basically, I use as many as I can. As long as the widest zigzag stitching goes over the twisted bunch ... GREAT!  (In the photo above, I've separated the yarns.  When actually stitching, I hold them close together ... with a slight twist.)  All these yarns were part of skeins ... except the fuzzy lime green.  I fed it into the strands, one after another.

Often, I have the individual strands in various boxes or nearby drawers.  This prevents them from getting tangled on their way to the machine.  Of course, Ernie had to help with all of this.  (The lime green fringe is on my work table.  When one piece ended, I fed the next one into place.

For two or three days, all I stitched was balls of cording.  Believe it or not, there's fuzzy lime green fringe in both green balls. The smaller green ball of cording is 87 yards in length.  I only know this because I used a fancy, 100% nylon, celery green decorative yarn made by Crystal Palace for their "Party Ribbon" collection.  Apparently, this color is no longer available.  In fact, I think the entire company closed in 2017.  I don't know where I got this yarn (probably Bill Mishoe's auction or a yard sale). It still had its wrapper, never used.  That ribbon yarn was fairly thick and sort of obvious in the cording.  I started the larger green ball of cording when I ran out of the "ribbon".  Generally, running out of a yarn is no problem.  Anything similar looks perfectly great.  Therefore, stitching excess yarn into cording is a wonderful way to give new life to old material.

In order to answer the nice lady's email questions, I took a few photos of the first fiber vessel stitched.  The lady wasn't sure how I got the spiral of yarn to start forming the vessel.  (She had her machine in a cabinet.)  I explained that I don't use any sort of flat attachment.  When the spiral gets to the edge of the machine, my hand (which is helping the rotations) happens to be pushing slightly downward.  The first time I made a fiber vessel, I didn't realize that this was even happening.  Because there's nothing under my hand, the spiral doesn't stay flat ... in starts to curl!

Within just a few more rotations, the downward curl is obvious.  This is the base of the fiber vessel. Please note, I keep the center of the spiral at a 90 degree angle from the needle.  My right hand is holding the cording and making it lay against the spiral.  My left hand is open ... helping the rotations and keeping the spiral/vessel in place.

 
As I zigzag around, the vessel forms.  I also keep my machine at the edge of my work table ... so that the fiber vessel holds its shape even after it is wider than the machine's base is tall.
 
Of course Ernie had to help with almost every fiber vessel ... which was an awful lot of work for one cat!  By the end, I had twenty-one fiber vessels finished, photographed, priced, and uploaded to my sales blog!  All the previously sold vessels have been removed from that blog.  Selling on-line is a new world ... and a lot of work for both an artist and her cat!