Monday, February 26, 2018

Gotta Love a Weekend!

 (Above:  Courtship Bench.  Found objects and anonymous photos.  16" x 17" x 8".  I bought the doll bench last Friday night.  I knew it was "Made in China" but I also knew exactly what I was going to use it for!  Click on any image to enlarge.)

My husband Steve and I own our business, Mouse House.  We do limited custom picture framing ... which means that I frame pictures for part of each weekday but that I spend the rest either making art or doing the "paperwork/computer work" necessary to sustain my studio practice.  Weekends are different!  Studio time!  Gotta love a weekend!
 
 (Above:  Courtship Bench, detail.  The vintage pin holder was purchased at least a year ago.  It was on a "table lot", the remains of some anonymous woman's sewing stash.)

Generally I spent every Tuesday and Friday night at my favorite auction house, Bill Mishoe's Estate Services.  I watch the remains of other people's lives sell to flea market and antique dealers, young couples just starting out, and "regulars" like me.  Sometimes I bring home a few items, especially things  that work well with my solo installation Anonymous Ancestors.  I admit it; I don't really need anything else for this exhibition.  I just can't help myself.  Repurposing old frames and photos is giving these neglected items a new lease on life.  Also, I just confirmed a new show!  Making a couple more things for this opportunity seemed the best way to celebrate! 

  (Above:  Courtship Bench, detail.  The black spray-painted artificial flower came from Blues Chapel, one of my first installations.)

Anonymous Ancestors will be on view at the Theatre Art Galleries, 220 East Commerce Avenue in High Point, NC from May 31st until August 3rd.  I'm very much looking forward to transforming the space!

 (Above:  Courtship Bench, reverse.)

Now, I know that this 3D assemblage probably will not go to the show in High Point, but it was inspired by my obsession with anonymous photos.  I also knew that the doll bench was "Made in China" but I successfully bid on it anyway.  I knew exactly what I wanted to do with it.  I had the weekend to select and frame two photos, figure out how to get them mounted while tilted, and collage the back. 

 (Above:  Courtship Bench, reverse.)

The antique chromolithograph flowers were once part of The Garden Magazine, dating from the late 19th century.  It might seem a shame to have cut two of these images up, but I've had them for at least two decades and haven't been able to sell either for as little as five-dollars.

 (Above:  Courtship Bench, reverse, detail.)

The heart-shaped pin cushion also came from Bill Mishoe's auction ... more than a year ago.  It seemed to be waiting for this creation.

 (Above:  Lunette XXXI. Unframed: 17" x 23"; Framed: 22" x 28". Inventory # 4241. $495.)

Over the weekend I also constructed, stitched, and melted Lunette XXXI.  It will be going to the ACC (American Craft Council) Atlanta show next month.  I'm in booth 1408 from March 16 - 18.)

 (Above:  Lunette XXXI, detail.)

Before going to Atlanta, I want to make several, small "In Box Series" pieces.  I'll be tackling them during the week and on Sunday.  Why not Saturday?  Well, some weekends aren't spent entirely in my studio.  Next Saturday will find me on the second floor of the Richland County Main Library making bookmarks with the public.  This is part of the Deckle Edge Literary Festival.  It's going to be loads of fun!

 
(Above:  Mended Words XIV: Pandora's Box.  Hand-colored antique engraving, ripped and stitched with collage.  Mounted on 20" x 16" mat board.)

Speaking of "literary arts", I'm continuing my "Mended Words" series.  It's so much fun to look for engraving that might be altered in this fashion. The statement is just a general one but appropriate to the image title.


(Above:  Mended Words XV: Innocence. Hand-colored antique engraving, ripped and stitched with collage.  Mounted on 20" x 16" mat board.)

This piece uses a quotation by Edna St. Vincent Millay.  I have several others in this series to create, plus I've got a stack of "Great Quotations" on antique dictionary pages to make too.

 (Above:  Ancestor Wall, All for One and One for All.)

Finally, this past weekend included making two more pieces for my "Wall of Ancestors" ... which will be part of the upcoming Anonymous Ancestors exhibit.   Can't wait!

(Above:  Ancestor Wall, The Salad Days.)

I am linking this post to Nina-Marie's "Off the Wall Fridays", a site for sharing fiber arts. 

Wednesday, February 21, 2018

Lunette XXX

(Above:  Lunette XXX. Inventory # 4235.  Framed: 22" x 28". $495. Polyester stretch velvets on recycled black packaging felt with free-motion machine embroidery and melting techniques.  CLick on any image to enlarge.)

Now that all my work has returned from my solo show at Waterworks Visual Art Center in Salisbury, North Carolina, I have been able to figure out just what I want to make before next month's ACC (American Craft Council) show in Atlanta.  This is the first of two Lunettes I plan to create.  I love making these pieces.

 (Above:  Lunette XXX, detail.)

I will also be making some more In Box Series pieces too.  So, stay tuned!

(Above:  The Key to Fortune.  Framed: 7" x 6 1/4". $40.)

Of course, I can't help myself when it comes to keys.  Here's another one!

I am linking this blog post to Nina-Marie's "Off the Wall Fridays", a site for sharing fiber arts. 

Sunday, February 18, 2018

Another busy week!

Above:  New work made while conducting my two-day HOT workshop.  From left to right: In Box Relic CC, a special gift to a new friend; In Box Relic XCIX ($60); Relic CCII ($100); and In Box Relic CCI ($60).

When I'm conducting a workshop, I think it is important that I present myself as a "working artist" who produces ART.  All my demonstrations really do get finished, framed, priced and hopefully sold.  I encourage participants to "make art" by example, not by "workshop samples" but through a series I call "relics".  Each finished piece is like an artifact from the time I spent sharing what I know and what I do.


This past week found me in St. Augustine, Florida.  It was wonderful!  I'm really too busy to snap pictures during most of the workshop but I try to have a "show-and-tell" during the last hour.  That's when I take a few pictures of all the wonderful pieces created during the two days.


While in Florida, I made new friends, including Cindi (who hosted me in her lovely home and planted this pretty flower) and Laura (who made all the arrangements, dinner reservations, and handled all the money!)  I can't thank you two enough!


Unfortunately, I forgot the name of the very, very generous lady who donated this amazing stash of yarn to my recycling efforts.  Not only will this bonanza be turned into fiber vessels, but some of it is perfect for wrapping more wooden thread spools!  THANK YOU!

I truly enjoy teaching HOT: Heat Activated Techniques for Contemporary Embroidery and will be conducting it as a two-day and a five-day experience at QSDS this summer in Columbus, Ohio.  (For the Quilt and Surface Design Symposium website, CLICK HERE.  I'm teaching from May 28th through June 3rd.)  I'm also thrilled to be on Mary McBride's faculty for Focus on Fibers, a retreat at the Atlantic Center for the Arts in New Smyrna, Florida!  If enrollment is sufficient, I'll be headed back to Florida to teach Second Life on April 7th and 8th!  (CLICK HERE for more information.)

Teaching workshops is important to me.  I always learn something too, generally about myself and my own artwork.  I learn where I'm at creatively.  I find balance in my every day life.  I also have time (especially when driving!) to consider directions for the future.  So ... thank you to everyone who has signed up and taken one of my workshops! It really means a lot!

(Above:  Nike's Advice VI.  45" x 60". Acrylic paint on unprimed canvas with free-motion machine embroidery and hand-stitched binding.)

Before leaving for Florida, I finished all the machine stitching on Nike's Advice VI.  I took the piece with me and managed more than half the blanket-stitched binding during an evening with Cindi.  Once home, it got done and I decided to photograph it on the driveway.

(Above:  Photographing Nike's Advice VI.)

The daylight was perfect, a bright but overcast day without any shadows.  Steve helped erect all three ladders and the wooden ramp we use to put our moped into the cargo van.  The tripod and camera were firmly put into a stable place.  I'm pleased with the resulting photos ....


... especially the detail shots! (I am linking this blog post to Nina-Marie's "Off the Wall Fridays", a site for sharing fiber arts.)

Friday, February 09, 2018

A Busy Week!

 (Above:  A Baby Goat is Called a Kid, The Wall of Ancestors.)

I've been on the go ever since returning from two workshops in Alabama taught during the week in which my solo show, Anonymous Ancestors, closed at the Eastern Shore Art Center in Fairhope. It was a wonderful time even though I had to pack up the their installation.  I don't need more pieces for it but I can't help myself.  I keep making more.  After all, how can I resist adding the phrase "A Baby Goat is Called a Kid" to a picture like this!

 (Above:  Donation of old photos from Stephen Savage, board member at the Eastern Shore Art Center.)

The photo came from an amazing gift.  Stephen Savage is a professional photographer in the Mobile and Fairhope area of Alabama.  We gave me a big box full of old photos.  Some were unknown family members.  Others ... well ... simply anonymous and totally ripe for collaged phrases like ...

 (Above:  What Happens on the Buckskin Stays on the Buckskin, Wall of Ancestors.)

... this!  There are quite a few more than will soon be transformed for the installation.

 (Above:  No One Could Look Me in the Eyes and Not Tell the Truth. Wall of Ancestors.)

I got this old, anonymous image and frame from Bill Mishoe's auction.  It is BIG, measuring 31" x 27".  I particularly like big pieces for this installation.  They are generally the center or focal point for a vignette of pictures on a wall.

 (Above:  Relic XCVI.  Matted to 11 1/4" x 10".)

Of course I did some stitching during the week, finishing up Relic XCVI.  Each "relic" started as a demonstration piece in a workshop.

 (Images from the Allatoona Quilt Guild.)

I am free-motion stitching on another, large canvas painted in public during an art event called Nike's Advice.  It isn't complete yet.  Why? Well, I've also spent time with the Allatoona Quilt Guild outside Atlanta, Georgia.  I presented a truck show but got to enjoy the guild's general meeting and fabulous "Show-and-Tell".  Some of the work is donated to charity.  Some is the completion of a piece bound for a special family member or friend.  One lady modeled her quilt, a great jacket.

 (Above:  Images from the Southern Pines Quilt Guild.)

I forgot to share these photos taken last month.  I went to the Southern Pines Quilt Guild in North Carolina and gave a trunk show there too.  Again, these ladies are so talented and very, very generous.

 
 (Above:  Mounting 19th century dictionary pages to fabric and collaging vintage and antique images to each one.)

Some days are spend doing prep work.  This week I fused fabric to the reverse of 30+ pages selected from Charles Richardson's English Language Dictionary, 1846 and added images cut from pre-1950s magazines and assorted 19th engravings.  Soon I'll be adding some free-motion embroidery and collaged letters.  They will become the next wave in my new Great Quotations series.

There's never a dull moment here.  Tomorrow my husband Steve and I go to Salisbury, North Carolina to pick up my recently finished solo show.  Next Tuesday will find me in St. Augustine conducting another two-day HOT workshop and giving a power point lecture.  I've got a grant due on the 15th and several juried shows to enter.  Between the "paperwork" of art, the promotion of art, and the actually making of art, I sometimes feel like I have three jobs.  Thankfully, I like to keep busy!

I am linking this post to Nina-Marie's "Off the Wall Fridays", a site for sharing fiber arts. 

Saturday, February 03, 2018

Nike's Advice III and other work

(Above:  Nike's Advice III, framed. 34" x 42". Assorted paint, oil pastels, and ink on unprimed canvas with self-guided, free-motion stitching.  Click on any image to enlarge.)

During the annual spring art crawl, Artista Vista 2016, I painted over hundred feet of canvas with the public.  My friends Barry Wheeler and John Allen created a video of the experience.  (CLICK HERE for the one-minute, time-lapse of the experience.  It is a blast!)  For over a year, I did nothing with the fabric.  Now, I'm really enjoying stitching some of it. 


 (Above:  Nike's Advice III, framed and hanging beside my mat cutter and small Seal dry-mount press at Mouse House, my business.)

The first two pieces had three layers:  the painted canvas (top), recycled industrial packaging felt (middle), and blank canvas (bottom ... more from the same, original bolt of fabric).  These first two were finished without a frame.  The edges were simply button-hole stitched. Yet, I wondered if I really needed the packaging felt.  There was only one way to find out ... TRY IT.

(Nike's Advice III, detail.)
  
Nike's Advice III is the result.  Although I have the next piece under my sewing machine and it has the felt layer, I'm now wondering about using a larger piece of the canvas on the back ... and stretching the finished work around wooden stretcher bars.  One thing always seems to lead to the next!
 (Nike's Advice III, detail.)

I'm very pleased with the finished work and hung it at Mouse House, the limited custom picture framing shop I own with my husband Steve.

 (Nike's Advice III, detail.)

Yet I wasn't pleased until making the decision to cut off approximately 6" from the right side and 3" off the bottom.  This fabric was painted without much thought to composition, color, or even having any edges.  The bolt was simply suspended from the ceiling.  It flowed down onto two folding tables.  As the fabric was covered, I pulled more fabric down and continued painting.  Even though I thought I cut a nice arrangement, it needed a little trimming.

 (Above:  Nike's Advice IV.  10 1/2" x 10 1/2". $40.)

I took the parts I trimmed away and made two little pieces.  It was fun to work with the scraps, cut them, and make a new arrangement.

 (Above:  Nike's Advice V.  9 1/4" x 15 1/4". $50.)

These two little pieces were shrink wrapped and thrown into a print bin. 

 (Above:  Relic XCV.  Unframed 6" x 5".  Framed: 11" x 12".  $100.)

Every time I conduct one of my "HOT" workshops, I finish the demonstration piece.  I figure that I'm hired not just for a "workshop" piece but as a working artist.  I ought to be making art.  So, that's what I do.  This is the piece from last week's workshop in Fairhope.  The one I stitched in Mobile never made it home.  It was sold to one of the participants!  That really makes me happy because it means that I am succeeding in my desire to "teach like an artist" not just as someone going over a lesson plan!

(Above:  Window CXLVII.  Framed: 15 1/2" x 12 1/2".)

Before I left for the two workshops in Alabama, a friend commissioned me to create a special piece for her mother's birthday.  She selected a design from one of my earlier Lancet Windows ... but just the top half.  Happily, she picked it up today.  Commissions are always very special too!

Friday, February 02, 2018

Using the Embellisher for Unique Background Fabric

 (Above:  The Key to All the World.  Inventory # 4217. 11 3/4" x 9 3/4". $70.)

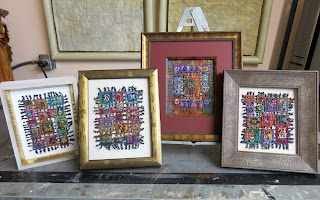
Yesterday I uploaded all the photos of the recently finished, tagged keys.  They are fun to make and I wrote about my approach ... using frames made from leftover and scrap picture moulding and old keys salvaged from one of my earliest art-making attempts.   Because there are about fifty pieces, I didn't really need a longer blog post.  So, I promised to blog about how some of the backgrounds were made using my Babylock Embellisher, a dry felting machine.  This is that post.

 (Above:  The blond wood frame and a scrap of silk fabric rusted with antique nails.)

This is how I started!  I grabbed the blond wood frame and selected a tagged key.  I found a scrap of silk on which I'd rusted antique nails.  I did the rusting over a decade ago and blogged about it HERE.  At the time, I intended to use the fabric in an altered book called Nails in a Coffin.  I made the book. My younger son created a video. We posted the video on this blog but Blogger's system doesn't seem to support it any longer.  I just reposted it on You Tube ... HERE.  I more than enough pieces.  Later, several were used for a 2015 collaboration with poet Al Black for an exhibition called Art from the Ashes.   Amazingly, I still had one piece of rusted silk left.


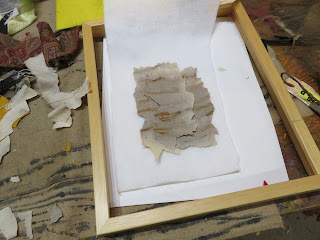
I cut the silk into three jagged-edged pieces and overlapped them on a piece of white acrylic felt.


Over the top, I added ethereal wisps of wool rovings, scraps of off-white fabric from an antique blouse, and some tan netting.  I worked from both the front of these scraps and the back, punching the machine's barbed needles through all the layers.  The wool rovings became totally embedded in the lower layers, revealing the lacy detail of the blouse.  Finally, I added three mother-of-pearl leaf shaped buttons, beads, and the tagged key.

 (Above:  The Key to the Future. Inventory # 4194. 10" x 8". $60.)

This is The Key to the Future.  It started with ...


... a really old, stained piece of wool cross stitch which came out of  frame I bought at auction.  The frame was used for my Anonymous Ancestors installation.  I washed the cross stitch, half expecting it to dissolve but it didn't.  At first, the water was totally brown.  I kept washing.  Why?  Well, I loved the distressed look of this scrap and knew its open weave would be excellent under the dry felting machine.  Lots of the keys I recently finished have this antique material in their backgrounds.


I cut strips of the pulled thread divisions to create a loose border for the flower design.  A piece of red synthetic felt went under it.  A little bit of tan colored wool rovings went over the top.  This background took all of five minutes to make (if that long).  It is wonderful to see unique combinations of fibers come so quickly to life.  A few sequins and beads later, the tagged key was added.


Another piece in my stash of odd materials was this really early cross stitch.  I made it for my mother-in-law after I first started stitching in 1983.  Even then, I was making up my own patterns.  I got it back when she died over a decade ago.  It isn't very well done but it served to remind me just how far I'd come in stitching and creativity.  No one else would recognize anything of quality in this tiny embroidery ... unless I turned it into something else.
  

So ... I took my scissors to it!  I put it on a piece of yellow felt ...


... put some olive green wool rovings and a few other scraps of random material on top ... and a scrap of ocher-colored ultra suede underneath ... and ran over it from both sides using the dry felting machine.

  (Above:  The Key to Kindness.  Inventory # 4212. 8 1/4" x 5 3/4". $50.)

I added a few straight stitches using orange colored perle cotton thread.  It became the Key to Kindness.


The rest of the cross stitch became the background for The Key to The Best ... in a genuine burl veneered frame.  (I just love burl picture frame moulding!  It really is "the best" in wood!)


I used a lot of olive green wool rovings on the reverse ... punching from the back ... allowing some of the green fibers to mingle onto the front.


This is how it looked under the machine's dozen barbed needles.


Next, I punched rusty-brown dyed scrim/gauze onto the back. A few loops of the gauze worked their way to the surface adding texture.  I trimmed the gauze nearly to the jagged edges but allowing the color to peek out around the perimeter.


To alter the front and obscure the strong linear design, I applied two patches of antique wool paisley.


This is how the scrap looked before I added the tagged key and a few star-shaped sequins and beads.


 (Above:  The Key to The Best II.  Inventory # 4208. 10 3/4" x 8 3/4". $70.)

This is how the finished piece looks ... the best!  I've very happy that an early piece was transformed into something someone can appreciate.  Using the dry felting machine is so much fun.  All the keys can be seen HERE and are available for purchase.  Just email me at mouse_house@prodigy.net.

I am linking this post to Nina-Marie's "Off the Wall Fridays", a site for sharing fiber arts.