Wednesday, February 24, 2021

Mandala XXXII

(Above:  Mandala XXII. 32 1/2" x 32 1/2". Found objects hand-stitched to a section of a tattered quilt.  Found objects include:  half of a film reel; keys; blue and red, plastic bottle caps; assorted beer caps; vintage Bombay plastic cocktail forks; hinges; metal frame hangers; Tinker Toy wooden spools; buttons; puzzle pieces; champagne muslet caps; Starbucks coffee stoppers; owl-eyed paper clips; laminated Tampa Nugget cigar bands; drapery hangers; soft, white, rubbery things that were the two halves of a medical device that holds a long needle for prostate radioactive seed implants (had to ask the nice nurse who donated them to my friend Flavia); and rabies vaccination tags for our cats ... past and present.  Click on any image to enlarge.)


(Above:  A 1000 piece puzzle of dogs.)

The inspiration for this mandala was another serendipitous experience.  Just when we received the rabies vaccination tag for Ernie, a friend donated a puzzle to my stash.  She generally passes her puzzle along to other friends, people to work puzzles.  But, this one was missing two pieces. She blamed her dogs.  She thought perhaps I could use puzzle pieces for a mandala.  She was right!  (Frankly, I can't imagine working this puzzle.  It looked impossible.  I sorted out all the "edges" for this mandala.)

(Above:  Detail of Mandala XXXII.)

Steve and I had no intentions of putting Ernie's rabies vaccination tag on a collar.  Ernie, like our previous cat Max, has no desire to wear one.  I tried to get Max to wear a nice, Velcro tear-away collar.  He lost the first one inside of two weeks; he lost the second one in two days; he lost the third one in two hours.  Cats have their own minds, and my cats don't seem to want to wear a collar.  Thus, the folder in our file cabinet contained all the tags from over the years for all our cats along with their veterinarian records.  What a find!  What perfect timing!  Dog puzzle pieces and cat rabies vaccination tags.  They were meant to be become a pet inspired mandala!

(Above:  Ernie's rabies vaccination tag.)

Ernie, of course, helped with every stage of this mandala.  Officially, Mandala XXXII has been "cat scanned"!


Speaking of a medical procedure, the odd shaped white objects surrounding a Tinker Toy wooden spool came from my friend Flavia whose work is all about recycling.  Flavia's friend saves various medical plastics for her.  What Flavia can't use, she has kindly passed on to me.  Both Flavia and I have extensive and strange stashes of found objects.  It's nice to have like-minded artist friends because "normal people" generally don't understand keeping so much useless stuff! LOL!


Friday, February 19, 2021

Leaves

(Above:  Six, framed pieces ... each just $50 plus SC sales tax and shipping.  Click on any image to enlarge.)
(Above:  Olive skeletal in white frame.)

Last week I transformed an older piece from my PLAYA Series into a new one called High Noon.  It was easy and fun.  I liked the results even better than the original.  Yet, I cut off one end of the older work.  That end/scrap was just sitting on my studio table, almost begging for me to use it.  So I did.  I added copper metallic foiling and an olive skeletal leave that was recently sent to my stash by my Canadian cyber friend Margaret Blank.  I cut a mat for it, one sized to fit into a "scrap frame".

(Above:  Blue Skeletal Leave in a rustic steel frame frame.)

"Scrap frames" is term that probably sounds pretty awful, but it really isn't!  At the end of every year, my husband Steve and I count things in our frame shop. It's called "inventory".  There is no sense in counting short sticks of discontinued moulding.  Steve simply builds lots of "little frames", maximizing what we have.  It then becomes my job to create something small and affordable to fit them.  It is a great design challenge.  I had so much fun with the scrap, I decided to take another PLAYA Series piece apart, cut it into five pieces, and transform them into five of the scrap frames.  These are the resulting pieces.

(Above:  Pressed four-leaf clover in a mottled gold/green frame.)

Margaret Blank sent me three small packages of different colored skeletal leaves.  So, there might be more of these small pieces in my future.  I also found this four-leaf clover in an antique photo album purchased at a recent auction.  

(Above:  Olive skeletal leaf in a rustic tan frame.)

In addition to a touch of metallic foiling, each one got a little free-motion stitching and a selection of beads.  

(Above:  Olive skeletal leaf with tiny shell beads.)

Margaret Blank also sent along the tiny shell beads used on this piece.

(Above:  Red skeletal leaf with red metallic foiling.)

I wasn't really sure that the red leaf would work out ... but it did!

Tuesday, February 16, 2021

Mandala XXXI

(Above:  Mandala XXXI. 46" x 46" when hung as a diamond; 32 1/2" x 32 1/2" when hung as a square.  Found objects hand stitched to a section of vintage quilt.  Found objects include:  Medical syringes, their plastic protective covers, and some other plastic part labeled "sterile" all donated by my friend and nearby neighbor Flavia Lovatelli; cloth female and male figures donated by my cyber friend Linda Laird in Colorado; clock gears and spiral spring, buttons, and four red plastic lids.  Click on any image to enlarge.)

This mandala is another piece made to reflect the on-going pandemic.  Unlike some of the pieces made last year, this one is totally hopeful and looking to the day when I can get my vaccination.  Steve got his first shot this past Friday and is already scheduled for the second one.

(Above:  Detail of Mandala XXXI.)

I couldn't have created this piece without the significant donations to my stash by my cyber friend Linda Laird or my nearby neighbor/friend Flavia.  Independently, they donated to my stash within a week of one another ... providing just the right things!  Medical syringes and "pink people"!

(Above:  Mandala XXXI hung as a square.) 

Not only is there a lot of hand stitching on this piece, but there was plenty of prep work to get the found objects ready.  Every one of those gray, plastic protective tips for the syringes had to have a tiny hole drilled into one end.  Every one of those syringes has a hole near the tip ... because there was no earthly way for me to remove the tiny bit of the needle still inside the syringe.  Every "pink person" required a minimum of seven stitches ... the ends of both hands, the ends of both feet, under each of the females' arms, on both sides of the males' necks, and a belly button.  Also, the corners were quilted with perle cotton because the negative space looked better than any found object.  This mandala took a long time to stitch but it was so worth it!  Now ... count down until everyone is vaccinated!

Wednesday, February 10, 2021

Mum's the Word and High Noon

(Above:  Mandala XXX.  Framed: 13" x 13".  Found objects hand-stitched on a quilt block. Found objects include: the lid from a vintage container of Mum's deodorant, yellow Tinker toy connectors, aluminum can pulls, laminated Tampa Nugget cigar bands, white plastic dairy container pulls, copper rivets, buttons, beads, clock gears, decorative wire squares, and champagne muselet caps.  Click on any image to enlarge.)

After patching together all the scraps of the vintage, pink-and-brown quilt in order to stitch Mandala XXIX, I had to find another quilt to use for the next round of mandalas.  None in my stash seemed promising.  Okay ... I admit it.  I only have three quilts in the stash.  One is a crazy quilt (which really wouldn't make a great mandala background ... besides, I have another plan for it.)  One is an appliqued floral ... which wouldn't make a great mandala background.  And one was this old, ugly quilt that I got at an auction on a table lot that had other things that I wanted.  I never wanted that ratty looking thing.  I just got it.


(Above:  The ugly quilt drying while on top of paint cans.)

I decided to washed it.  Because it is winter (which means rain here in South Carolina), I let it dry inside, on top of a bunch of old paint cans and buckets.  Trust me, the photo looks better than the real thing.  The "white fabric" is really a dinghy looking light gray.  I didn't think anything would look good stitched to this quilt.  I didn't think the dinghy strips between the blocks would translate well for a mandala base. I hated the way the reddish fabric was distributed.  There was lots of damage too. Yet, this was the only quilt in my stash that seemed even remotely workable.  So ... I cut it up.

(Above:  Mandala XXX, detail.)

I decided to stitch just one block ... to see if I still thought the quilt was dreadful.  Guess what!  I liked it.  I've already stapled a large, nine block section to my 30" x 30" stretcher bar.  Guess what!  It looks good too.  

Now ... a little about the centerpiece: MUM.  When drilling six tiny holes in it, I saw the tiniest words: Bristol Myers.  Then, I googled for more information.  Hilariously, this was the lid of a little container of fingertip applied cream deodorant. Developed in Philadelphia in 1888, this product had a zinc compound as its active ingredient and was named MUM for a reference to the adage "Mum's the word."  "Mum" was first used in 1376 by William Langland in his Piers Plowman, but the popularity of the slogan likely comes from Shakespeare's day, especially since the bard used it in Henry VI, Part 2 with "Seal up your lips and give no words but mum."  The lid has to date after 1931 because that's when Bristol Myers bought the original, Philadelphia company.  Personally, I think this lid was perfect for this mandala.  It will remind me to keep my mouth shut when initially passing judgment on an ugly quilt!

 
(Above:  High Noon. Framed: 22" x 12 3/4"; unframed: 15 3/4" x 6 1/4".)

Five years ago I created a series of work called PLAYA.  It was named for the incredible art residency program in the Oregon Outback.  I framed eight of them.  Only one ever found a permanent home.  Last week, I needed the picture frame moulding used on the other seven.  Sure, I could have ordered more moulding for my client's order ... but why?  I had perfectly good moulding hanging on the wall.  As a result, I experimented with the artwork that was removed from the frame.  From a horizontal orientation, I created a vertical.  Copper metallic foiling and a lot more free motion stitching were added.  A coil of cording became the focal point and the piece went into a new, walnut veneer frame.  I like it even better now.  When I find the time, I might just gut the other PLAYA Series and continue experimenting on the older artwork!

(Above:  Detail of High Noon.)

Saturday, February 06, 2021

Mandala XXIX

(Above:  Mandala XXIX.  30" x 30".  Assorted found objects and buttons stitched to a background of patched-together pieces of a vintage pink-and-brown quilt.  The found objects were selected because I didn't have enough of any of them to use for a more symmetrical/repetitive mandala.  Most objects were donated to my stash.  Some of the objects include:  wooden parts of a piano, pinking scissors, clock gears, a cello peg, tatting shuttles, miniature locks, assorted sewing machine feet, a typewriter erasure, a pewter soldier, buckles, costume jewelry, keys, a Squirt bottle cap, the last brass lighting fixture, large wire paper clips, zipper pulls, a reading award, drapery hooks, aluminum can pull tabs, champagne muselet caps, hinges, and some things for which I have no names.  Click on any image to enlarge.)

I cut apart the vintage pink-and-brown quilt more than a month ago.  Due to a few nasty stains, a damaged area, and a few blocks that had no pink at all, I ended up with more scraps than anticipated.  I almost threw them away.  Then, a really hair-brained idea occurred to me.  Why?  Well ... after posting one of my earlier mandala's on social media, I received a comment about mandalas. 

 
(Above:  Detail of Mandala XXIX.)

According to this writer, mandalas are meant to be dismantled after they are completed.  I didn't bother to correct this person. I knew this was wrong. All mandalas aren't meant to be dismantled, only SAND mandalas.  I've witnessed the creation and dismantling of a sand mandala in 2015 when Tibetan monks came to Vista Studios/Gallery 80808.  (CLICK HERE for a short video.)  Literally, this sand mandala was just outside my former studio's door.  The ceremony was amazing.  My interest in mandalas stems from this time even though I've seen dozens of ancient mandalas in all sorts of museums.  Yet, the idea of dismantling a found object mandala intrigued me.  What would it look like if the concentric circles could be dislocated?  How could I capture this sort of "coming apart" or "spinning out of control"?  First, the base would need to be different, less perfect.  So, I used #3 perle cotton and patched together the scraps of the quilt.  There is no formal pattern, just the suggestion that there once was.

(Above:  Mat board circles cut using my circular mat cutter.)

At about this time, it also occurred to me that I might use all the objects that just didn't work out for an earlier mandala.  I only had three wooden contraptions from an old piano and three nearly identical pinking shears.  These could form the center .... just slightly off center ... the focal point that wasn't perfect and spun out of control.  They could be surrounded by circles of random objects and circles of buttons, arranged in overlapping ways.  To do this, I cut several mat board circles to use to mark the patched-together quilt base.

(Above:  Detail of Mandala XXIX.)

I had a wonderful time using all these random bits and pieces.  Like the earlier mandalas, this piece was stitched while stapled to a stretcher bar.  Yet, it didn't have an even outside border and after drawing all my circular guidelines, I also knew I didn't have enough edge to wrap around a stretcher bar during the mounting process.  Something different would be needed for the final presentation.  The rest of this blog post documents the mounting and framing for this mandala.

First, I measured the average size of the quilt.  It would be about 28 1/2".  So I had my husband Steve build me a flat-topped, rustic, 2" wide frame with outer dimensions of 30" x 30".  I cut a piece of acid-free foam-centered board to fit inside the lip of the frame ... and then cut it as if a mat.  The image above shows the frame in which I've tacked this piece of 1 1/2" wide foam-centered board.

This photo is the "flip side" of the image above.  It shows the front of the frame with the foam-centered board installed. Please notice that the foam-centered board is like an interior "ledge".  In order to have the mandala mounted on top of the frame, the gap between the top/flat part of the frame and the foam-centered board/ledge needed to be filled.
This photo shows how I filled the gap.  I just cut another piece of acid-free foam-centered board the size of the opening of the frame.  It was glued onto the lower "ledge".  This made the top of the frame totally flat.
I spread the mandala on this flat surface.  I pulled/stretched the piece while tacking it to the frame. 
So .. why this seemingly complicated "ledge".  Well, the next thing I had to do was to secure the mandala to the foam-centered board.  I used buttonhole thread and stitched it down.  If I hadn't created the ledge but used a full sheet of foam-centered board, I would have had to stitch through TWO layers of foam-centered board.  The stitching is necessary to distribute the weight of the found objects.  This method prevents any sagging.  The mandala is quite secure!  I also weighed this piece.  It is ten pounds.

 Finally, I put the "fall out" from the "ledge" back into place, tapped it down, and put a full sheet of foam-centered board on top to finish the back with a professional look.

Monday, February 01, 2021

Relics

 
(Above:  Relic CCXXX. Framed 10 1/2" x 8 1/2". Polyester stretch velvet fused to fabric and embellished with melting techniques, beading, and both hand and free-motion machine embroidery.  Every piece in this post is only $100 plus SC sales tax and shipping.  Click on any image to enlarge.)

At the end of every year Steve and I start counting things at Mouse House, Inc., our limited custom picture framing shop.  It's officially called "inventory".  While I'm counting full sheets of mat board and foam-centered board, Steve is working in the garage counting picture framing moulding.  It only makes sense to NOT count small sticks.  Often a moulding has been discontinued which means there's no sense in keeping a four foot stick. We'll never have any more of it. Occasionally, the moulding is coming in with a slightly different finish which means there's no sense in keeping that short stick either.  So, Steve cuts and builds little frames.  We call them "scrap frames" (which sounds sort of like "junk" but it is only because they were made from leftover/scrap pieces.)  

 
(Above:  Relic CCXXXI. Framed:  12 1/4" x 9".)

It becomes my job to creatively fill these scrap frames with original artwork.  First, I cut small mats to fill the frame.  Most include a piece of scrap fillet (a thin piece of wood lining the inner opening of the mat.)  I don't have to count these short pieces of fillet.  I like using them too.  They often provide space between the glass and the artwork.

 
(Above:  Relic CCXXXII. Framed:  11" x 9".)

There are other ways to create space in the framing package too.  In the photo above, I've shimmed the mat up with strips of acid-free foam-centered board.  You can't see them.  They are glued to the underside of the mat.  After I finished cutting all the mats, I took them to my studio to create artwork for each one.  In a sense, this is "reverse framing".  Instead of selecting a presentation to coordinate with the artwork, I made artwork to coordinate with the framing.  It is a unique challenge.

 
(Above:  Relic CCXXXIII. 13 1/2" x 11".)

Each one of these pieces was made on a scrap of cotton upholstery fabric.  I've complicated the background with snippets of "this and that", especially sweeps of heat activated metallic foiling.  Then, I've added layers of polyester stretch velvet squares and rectangles, chiffon, and free-motion machine stitching.  Then, everything went to the garage.  I soldered grooves and divots into the polyester stretch velvet.  Finally, each one was stapled to a small stretcher bar before getting plenty of hand embroidery and beading. 

 
(Above:  Relic CCXXXIV.  Framed:  12 1/2" x 10 1/2".)

One by one, they were finished, mounted into their mats, and photographed before being closed up with glass.  I even took images of me holding each one ... for a better sense of size and scale!  More than that, I created a new flipcard sales site for just these pieces ... because I'm hoping to add to them.  During this past year, art sales have been down, of course!  Going virtual is an idea that is going to stick around and having artwork on-line is here to stay.  As an impacted artist, I'm trying my best to "get with the new program" by putting affordable work in front of new audiences ... basically ... trying to sell things on-line.  I hope this works!

 
(Above:  Relic CCXXXV. 11 1/2" x 9 1/2".)

CLICK HERE to see my new sales site for these Relics.  Each piece includes the following information:

$100 plus South Carolina sales tax and shipping. I accept all major credit cards.  To order or ask additional questions, please email me at either mouse_house@prodigy.net or susan@susanlenz.com.  My husband Steve and I can also be reached on the Mouse House business telephone, (803) 254-0842. We can accept FaceTime calls too!

 
(Above:  Relic CCXXXVI. 12" x 10".)

Generally, I send a PayPal invoice for each transaction.  One doesn't have to have a PayPal account to use their system.  Now ... one more thing about these pieces!  In the past, I only made Relics while conducting a workshop.  This work was the result of my first demonstration.  It became a place to show stitches (as opposed to me stitching on anyone else's artwork) and became my piece to demonstrate proper mounting techniques.  I always figured that I should "make art" when conducting a workshop.  Making another "sample" seemed a silly waste of time and materials.  Why shouldn't I make something that I was proud to sell while encouraging workshop participants to do the same?  Sometimes, I made several Relics during a workshop.  Because of the pandemic, I haven't had a workshop for over a year. My supply of Relics has dwindled to "next to nothing".  Because I don't have a workshop schedule for months and months, it seemed like this is something I ought to be doing! 

 
(Above:  Relic CCXXXVII. 13 1/2" x 10 3/4".)

It's been a great challenge and lots of fun.  I've always priced my Relics at $100 including the framing.  Generally, they've only been available directly from me ... here at my business, Mouse House, or in a workshop ... because I've taken some as examples.  I don't sell them through galleries.  Now, however, I'm offering them to anyone ... same price ... regardless of size or frame or anything else.  This could be lots of fun and a new way to have my artwork go places I'll never get to go!

 
(Above:  Relic CCXXXVIII.  Framed: 12 1/2" x 10 1/2".)
 
(Above:  Relic CCXXXIX. Framed:  11 1/2" x 9 1/2".)
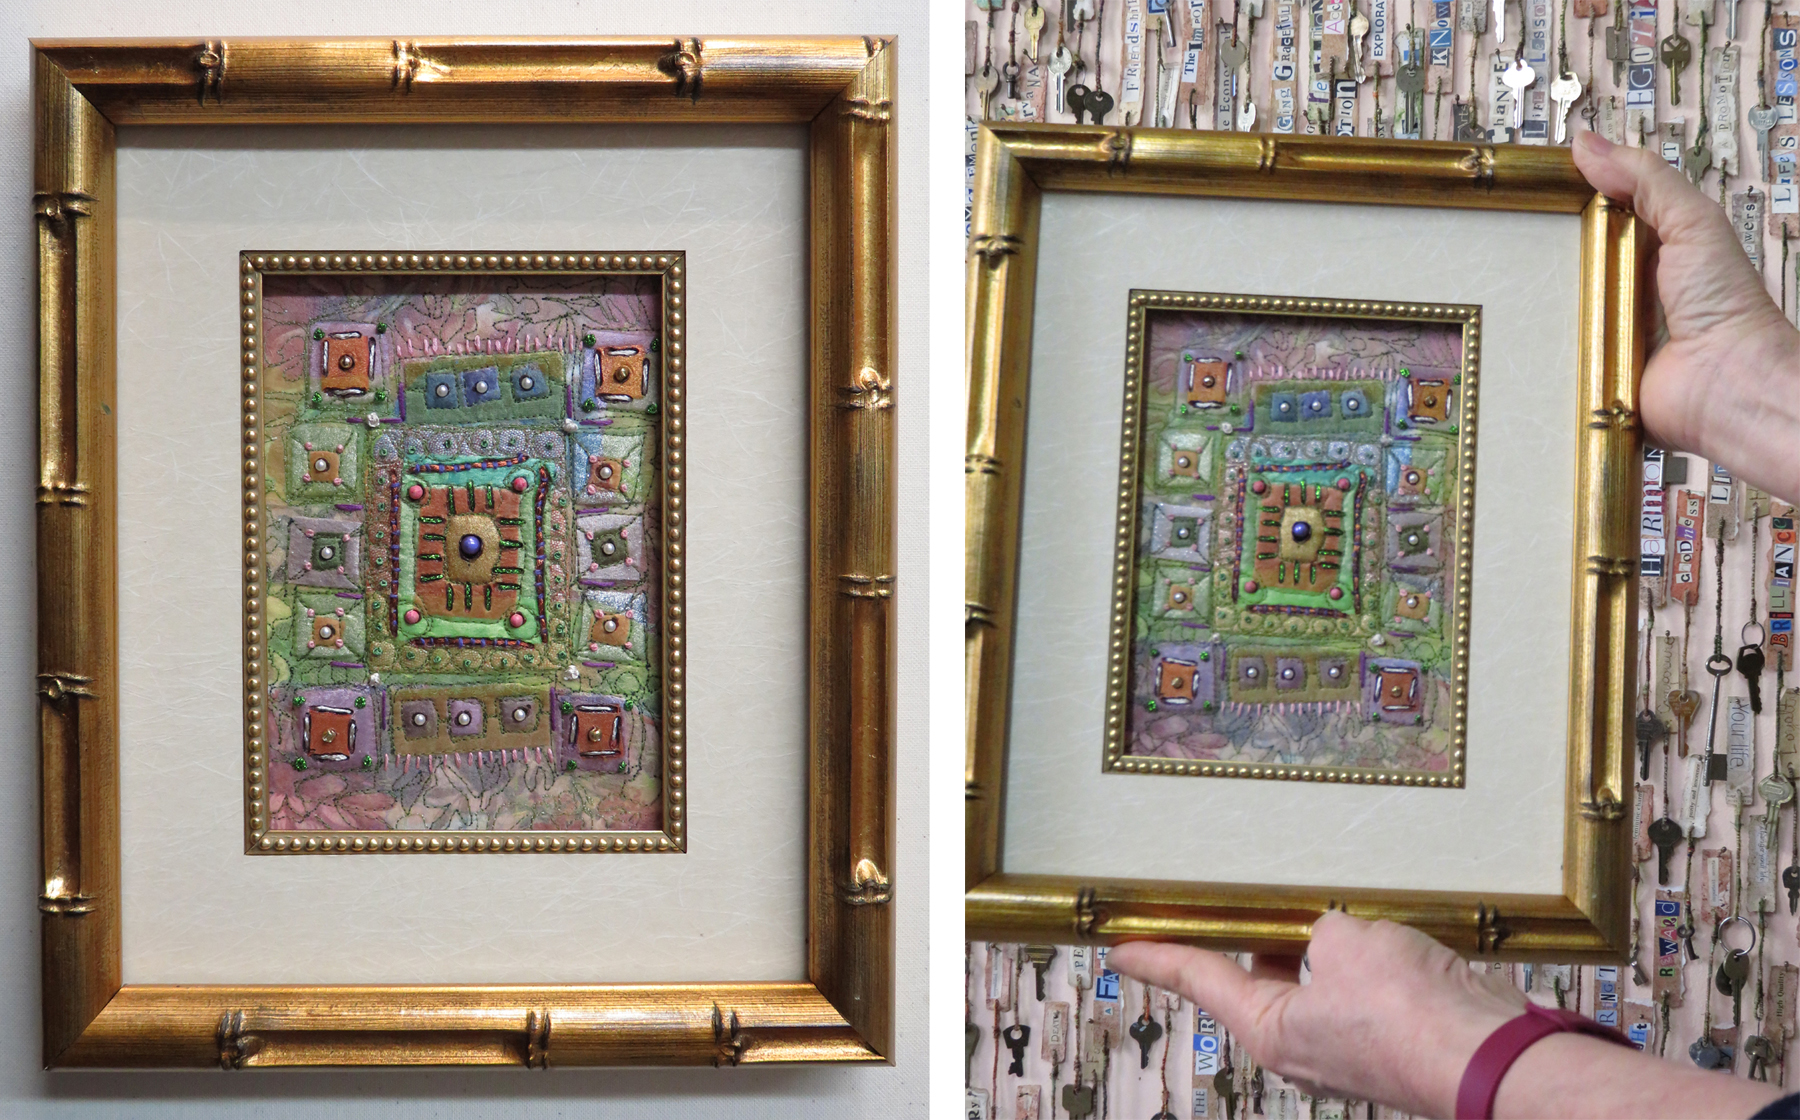
(Above: Relic CCXL. Framed:  14 3/4" x 12 3/4".  I snapped the photo on the left with the wrong setting.  The picture frame moulding looks much more like the photo on the left!)
(Above: Relic CCXLI. Framed:  14" x 12".)
(Above: Relic CCXLII.  11 1/2" x 9 1/2".)
(Above:  Relic CCXLIII.  Framed: 10" x 8 1/2".)
(Above: Relic CCXLIV.  Framed:  10 3/4" x 9".)